EasyVMS Gelişmiş Kurulum Kılavuzu, EasyVMS küçük ağ video gözetimi için önizleme, oynatma ve kayıt hizmetleri sunar. Bu kılavuz teknik hatalar içerebilir ve içeriği önceden haber verilmeksizin düzenli olarak güncellenecektir; güncellenen içerik, kullanıcı kılavuzunun yeni sürümüne eklenecektir. Bu kılavuzda açıklanan ürünleri herhangi bir zamanda iyileştirebilir veya güncelleyebiliriz.
Table of Contents
EasyVMS Gelişmiş Kurulum Kılavuzu P6SLite HiEasy APP
1.1.Sistem Özellikleri
Bulut cihazı ekleme ve yönetimini destekler
APP hesabına giriş ve kayıt desteği
Daha basitleştirilmiş sistem, daha rahat kullanım, çevre dostu ve reklamsız
Merkezi kullanıcı yönetimi, hata yönetimi, sistem bakımı ve TOPO navigasyonunu uygular
Oynatma işlevi sağlar, oynatma bağlantı durumunu izler ve ilgili durum bildirimleri sağlar
Yazılımın maksimum performansı
Maksimum bağlı cihaz sayısı: 256 Gerçek zamanlı önizleme kanalı: 64
Bağlı kanalların maksimum sayısı: 256 Uzaktan oynatma kanallarının sayısı: 4
Maksimum arama cihazı sayısı: 256 Uzaktan video sorgu kanalı sayısı: 4 Maksimum yerel kullanıcı sayısı: 16 Yerel oynatma kanalı sayısı: 1 Maksimum bulut hesabı sayısı: 1 Yerel video sorgu kanalı sayısı: 1
1.2.Sistem İşletim Ortamı
İşletim sistemi: Microsoft Windows 7 ve üzeri
CPU: Intel AMD 32-bit veya 64-bit Bellek: 4G veya üzeri
Not: PC platformlarının farklı işletim sistemleri ve donanımları nedeniyle, yazılım işlemlerinin düzgünlüğü ve işlevleri farklı derecelerde etkilenmektedir.
1.EasyVMS’nin Çalıştırılması ve Kullanımı
.
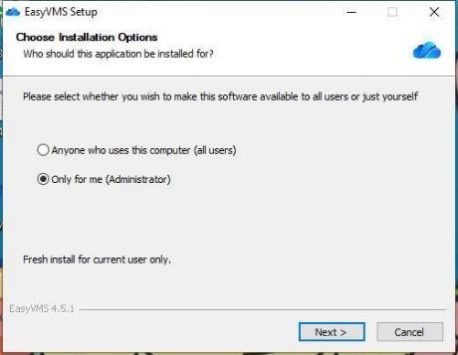
1.1.Kurulum
 Yazılım dizininde EasyVMS kurulum dosyasını bulun , üzerine çift tıklayın
İstemci yazılımını kurmak için EasyVMS kurulum dosyasını çalıştırın ve aşağıda gösterildiği gibi bir oturum açma iletişim kutusu açılacaktır.
.
EasyVMS yazılım kurulumunu iptal etmek için [İptal]’e tıklayın veya gösterildiği gibi arayüze girmek için [İleri]’ye tıklayın:
.
.

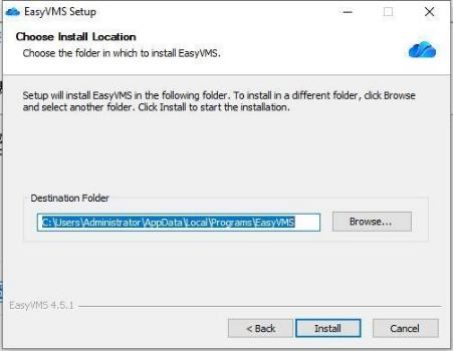
[Hedef Klasör]’ün depolama konumunu düzenleyebilir ve arayüze girmek için [Yükle]’ye tıklayabilirsiniz:
[EasyVMS’yi Çalıştır] seçeneğini işaretleyin ve EasyVMS oturum açma arayüzüne girmek için [Son] düğmesine tıklayın. [EasyVMS’yi Çalıştır] işaretli değilse, yalnızca EasyVMS’yi yüklemek için [Çalıştır] düğmesine tıklayın; EasyVMS çalıştırılmayacaktır.
1.2Giriş yapmak
.
1.2.1Yerel Giriş
.
 Click to run EasyVMS software and enter the EasyVMS login interface as shown
below:
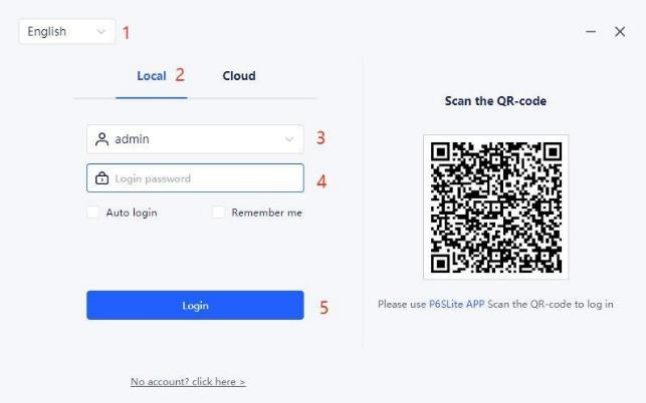
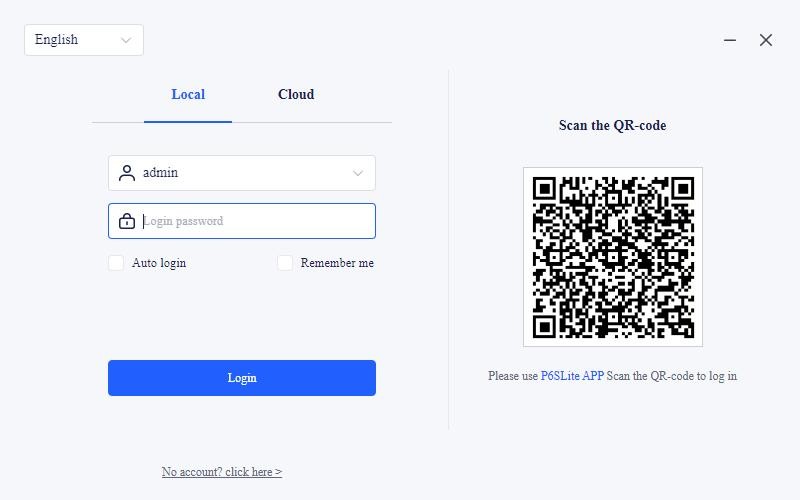
1.Select system language: Chinese, click [Local Account];
.
2.Enter the local account username and password, the default local account name is: admin, password is: empty;
4.Click [Login];
.5. Enter the EasyVMS management interface.
.
.
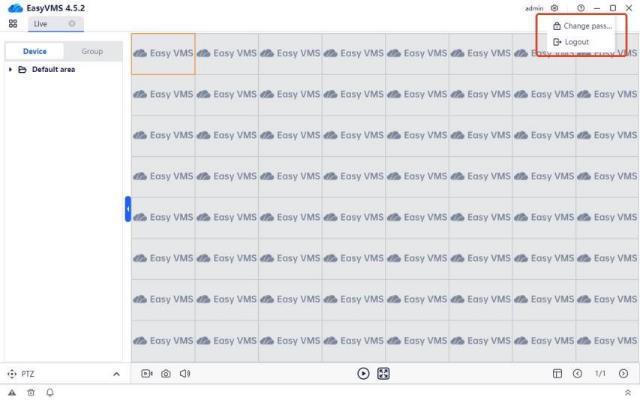
Select ![]() in the upper right corner of the software to modify the user’s password or exit the EasyVMS software operation, as shown below;
in the upper right corner of the software to modify the user’s password or exit the EasyVMS software operation, as shown below;
Note: The default username of the local login is admin, and the default password is empty.
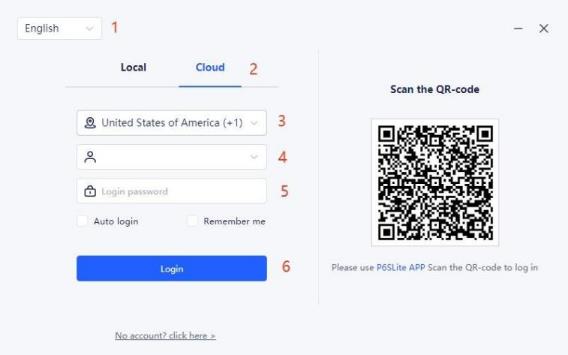
1.2.2Cloud Account Login
.
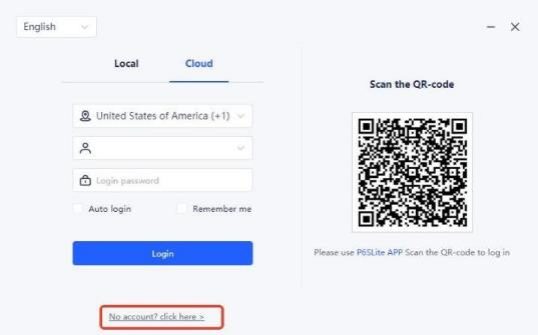
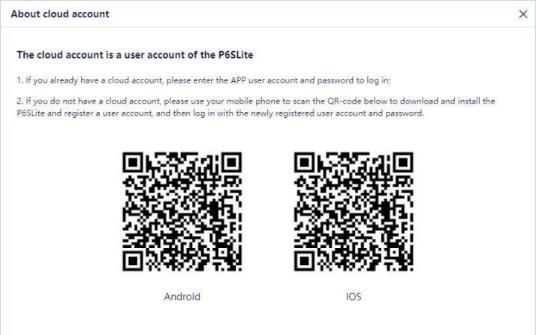
Cloud account registration: Select [No account? Click here] on the EasyVMS login interface, enter the cloud account description interface, and download P6SLite to register a cloud account as required.
Manual login with cloud account: After completing cloud account registration, follow the steps below to log in with cloud account:
.
1.Select system language: Chinese, click [Cloud];
2.Select service area;
3.Enter registered cloud account information, including user name and password;
4.Click [Login];
.5. Enter the EasyVMS management interface.
Note: The current cloud account supports selecting corresponding addresses by country.
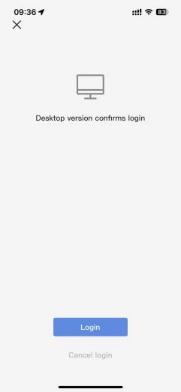
Scan and log in cloud account with P6SLite APP: Use P6SLite APP to scan the QR code, and the prompt will pop up on the mobile phone, as shown in the figure:
.
.
Click the [Cancel login] button to cancel running EasyVMS on the PC. Click the [Login] button to run EasyVMS on the PC.
1.2.3Automatic Upgrade of New Version
.
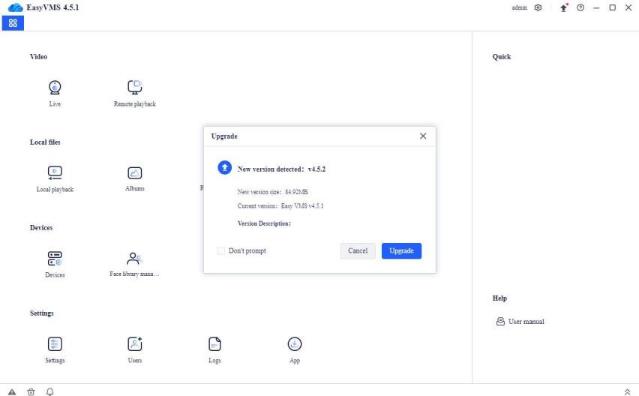
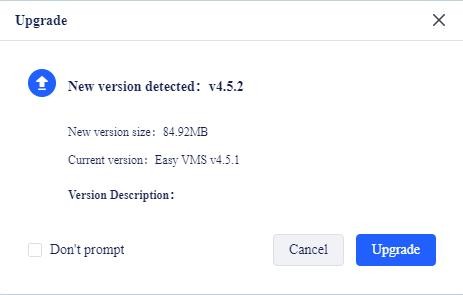
Run EasyVMS and enter the EasyVMS login interface. When EasyVMS detects a new version, a prompt will pop up as shown in the figure below:
Click [Cancel] to cancel upgrading to the latest version.
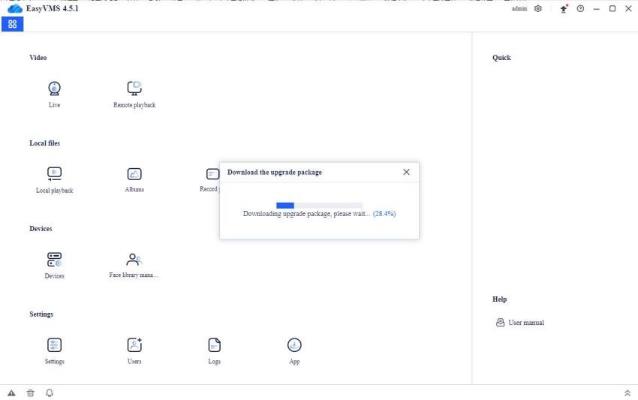
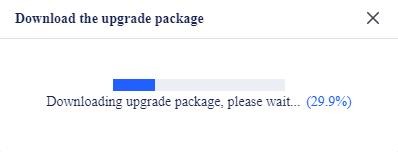
Click [Upgrade], the “Download the Upgrade Package” prompt box will pop up, as shown in the figure below:
.
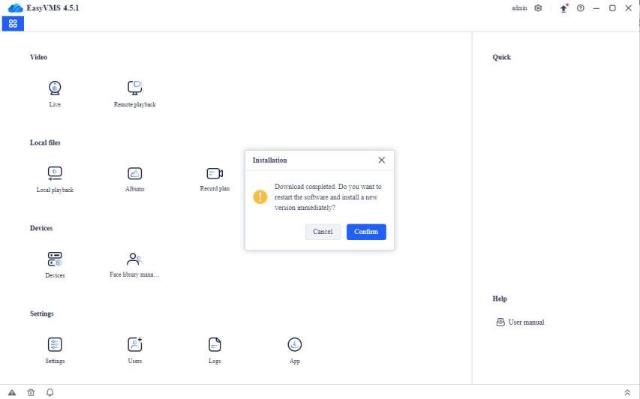
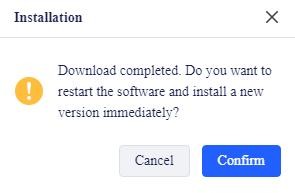
After the latest version is downloaded successfully, a prompt box ” downloaded completed , do you want to restart the software and install the new version immediately?” will pop up as shown in the figure below:
Click [Cancel] to cancel installation of the latest EasyVMS firmware
Click [confirm], and the EasyVMS software will be automatically logged in after the latest firmware is installed.
.
1.3Interface Introduction
.
1.3.1Interface Introduction
.
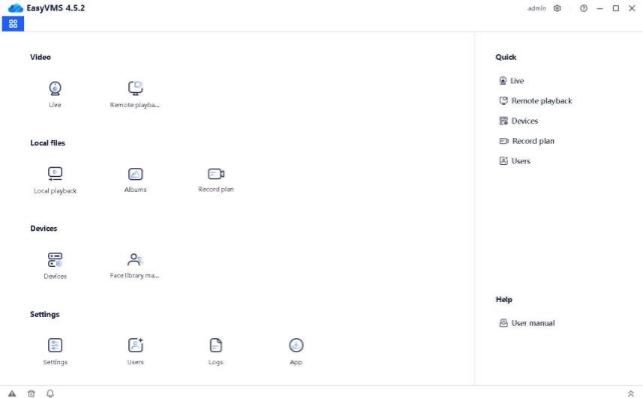
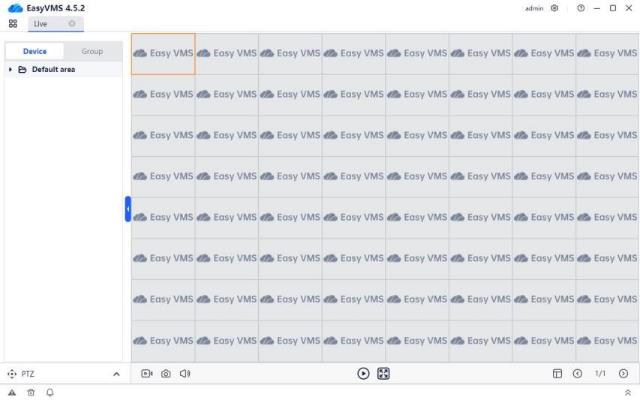
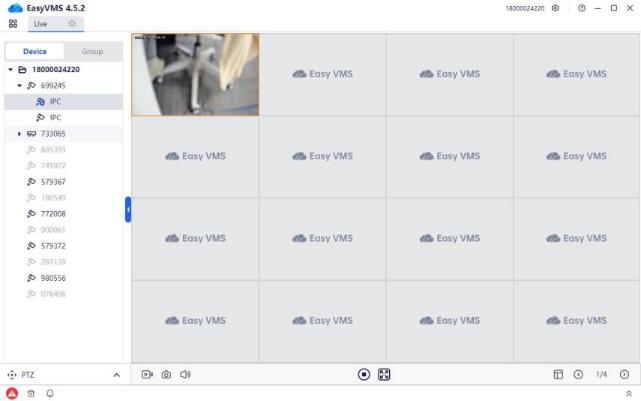
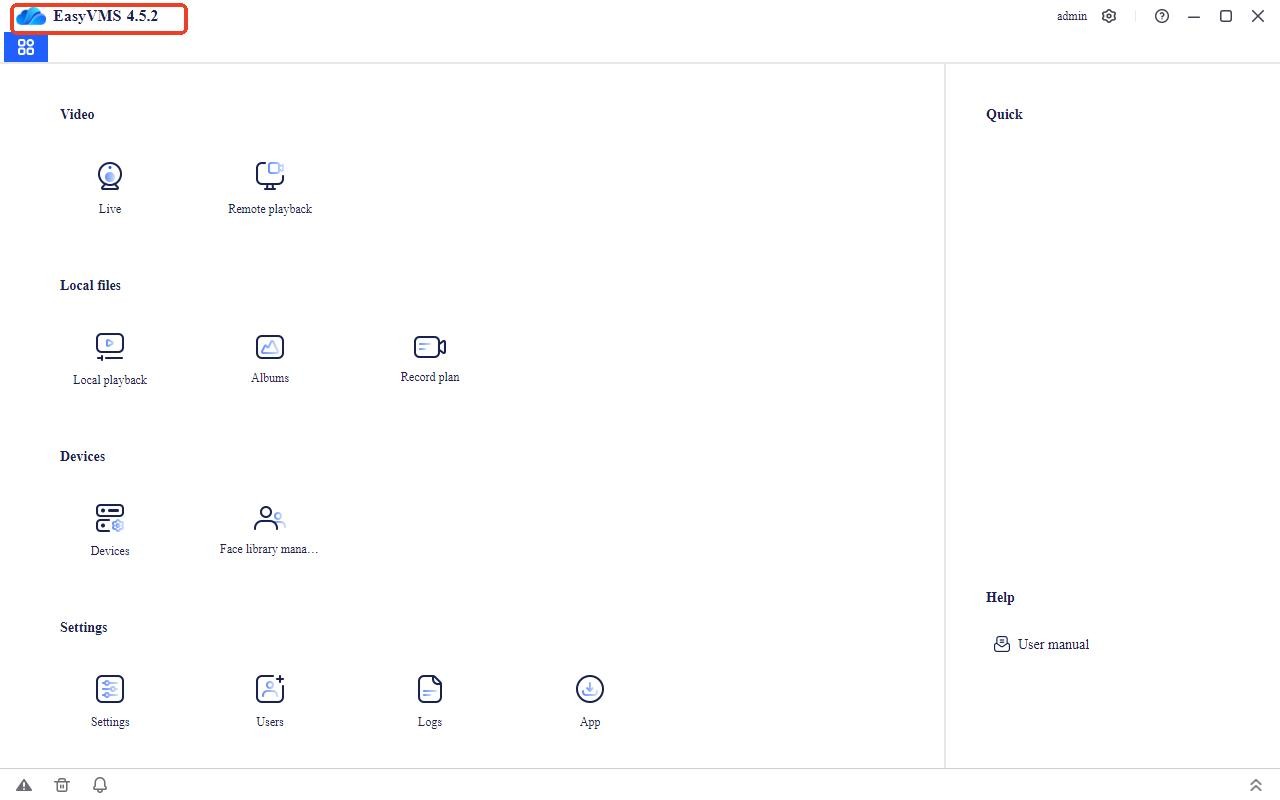
Select EasyVMS on the start menu, or start the shortcut on the desktop. After successful login, it will be shown in the figure below.
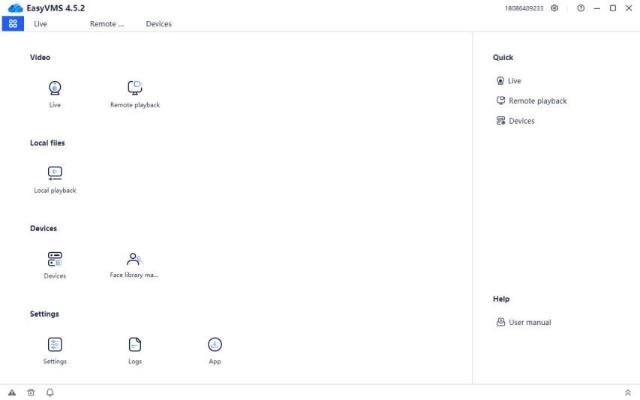
The main navigation buttons on the top of the interface are live, remote playback, local playback, Albums, Record plan, Face library management, Setting, Users, Logs, and APP. You can click the navigation button to enter the corresponding configuration interface. On the left side of the interface is the navigation, on the right side are the common functions and user help manual, and in the upper right corner are the current account login status, settings (including logout and password change), help, minimize, maximize, and close buttons. First start with device management and add devices.
1.4Function Introduction
.
Click the device management button to enter the device management page, as shown in the figure below; in the device management page, you can perform manual addition, modification, batch deletion, batch upgrade, APP cloud account management, regional addition, batch addition, batch IP modification
and successfully added devices, right-click remote settings, time sync, clear alarms, display QR codes and other functions.
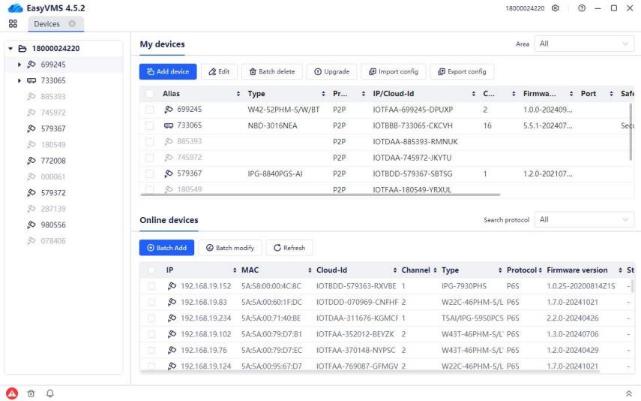
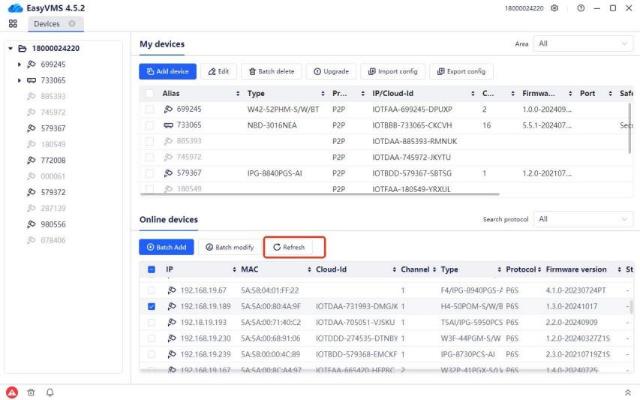
1.4.1Device Management
.
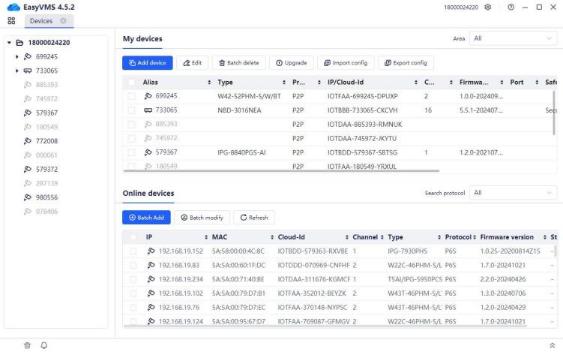
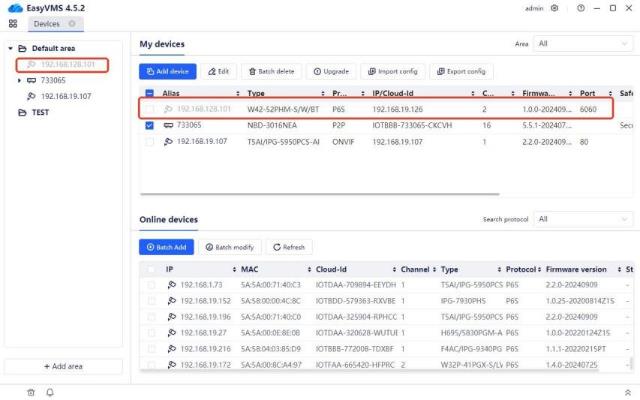
Device management is displayed in two areas: added devices and LAN online devices (as shown in the figure below)
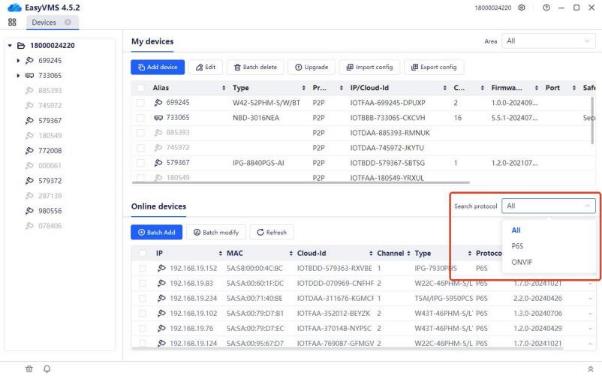
LAN online devices are detected device information (the detection protocols are only P6S and ONVIF), which can be filtered by the detection protocol on the right. Support (all, P6S and ONVIF protocol specific filtering)
LAN online devices: device IP, MAC, DID, device channel number, device model, protocol type currently used by the device, device firmware version and status will be displayed during detection. (Note: The status mainly displays the devices that have been modified in batches and the current response status of the device)
.
1.Refresh button: refresh and display the devices that have not been added to the area in the LAN, and the devices that have been added to the area will not be displayed.
.
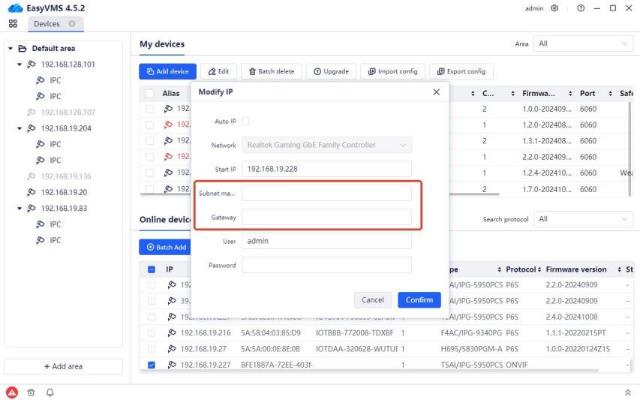
2.Batch modification button: modify the IP of the detected devices, and support one-click IP planning for one or several devices. There are two ways to set up, manually modify the IP or set the IP in sequence according to the computer network segment order.
For example: the starting IP is 192.168.19.152, and two P6S protocol devices are checked. The IP of device 1 will be changed to 192.168.19.152, and the IP of device 2 will be changed to 192.168.19.153.
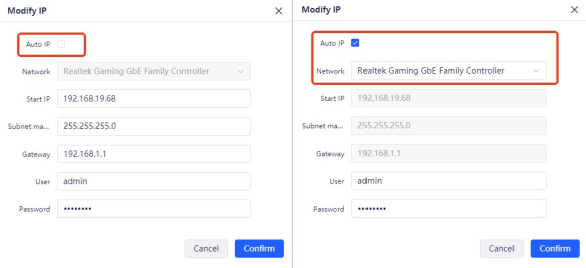
(Note: When checking the ONVIF protocol device to modify the IP in batches, the default display cannot obtain the subnet mask and gateway, and the current protocol version does not support it)
.
3.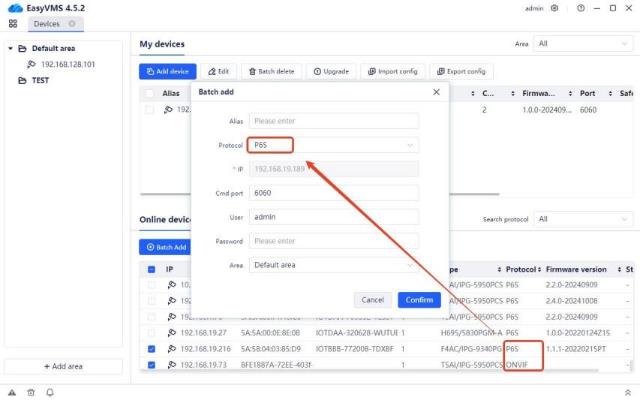
Batch addition button: add devices to the corresponding area of the added devices, supporting single selection and multiple selection. When multiple devices with different protocols are selected by default, the protocol of devices added by default is the protocol of the first device checked.
When adding in batches, you can switch the protocol type among P6S, P2P and ONVIF.
.
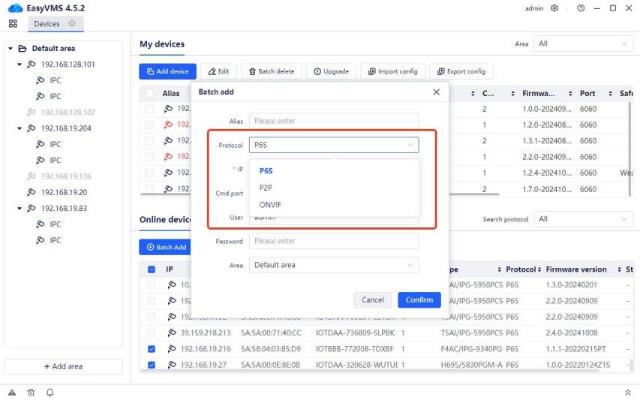
.
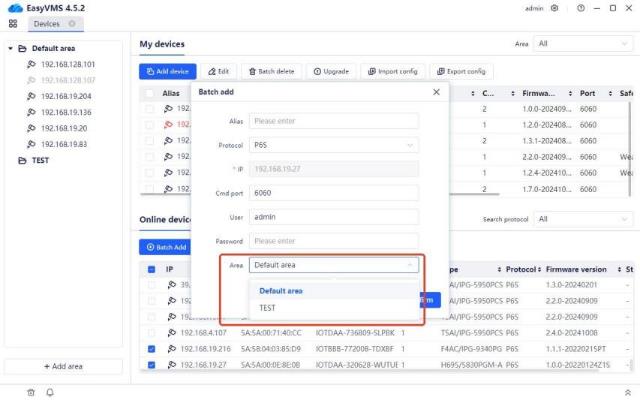
When there are multiple areas on the left, clicking batch addition allows selecting the area to the corresponding area on the left.
After adding, the default alias of the device added by P6S or ONVIF protocol is ip, and the default alias of the device added by P2P protocol is the number in the middle of the did number.
.
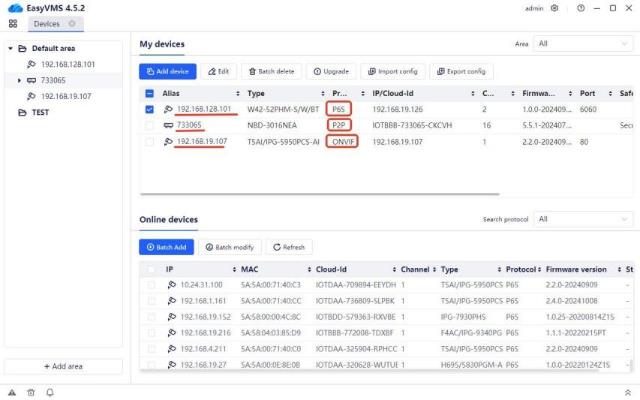
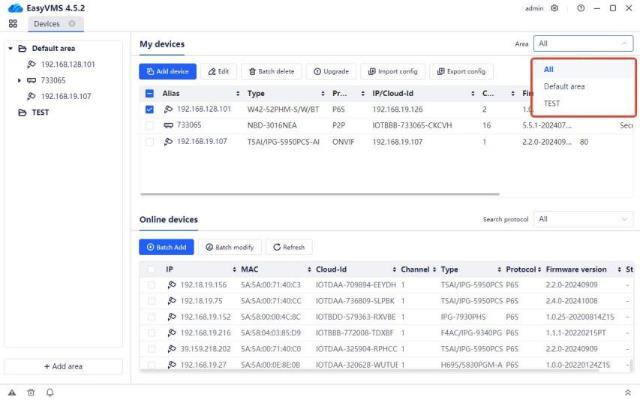
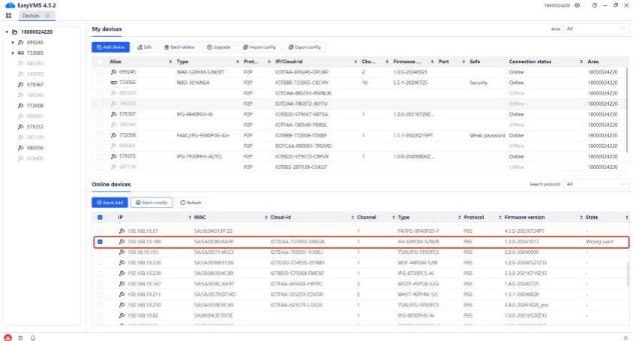
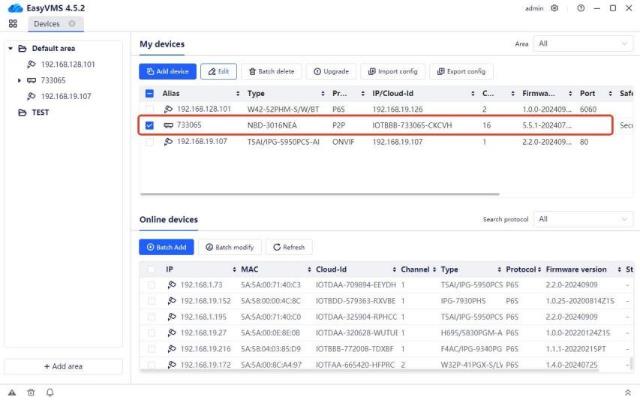
When a device has been added, the corresponding device information can be found in the added devices and the corresponding default area on the left. For the added devices, there is a regional module in the upper right corner to support the division and screening of devices in multiple areas.
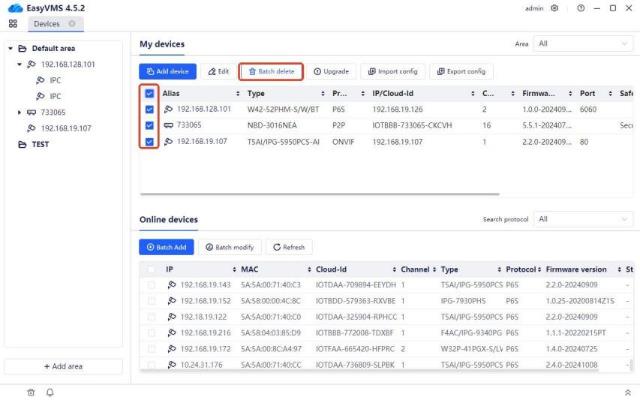
Added devices: manual addition, modification, batch deletion, upgrade, batch import configuration and batch export configuration functions.
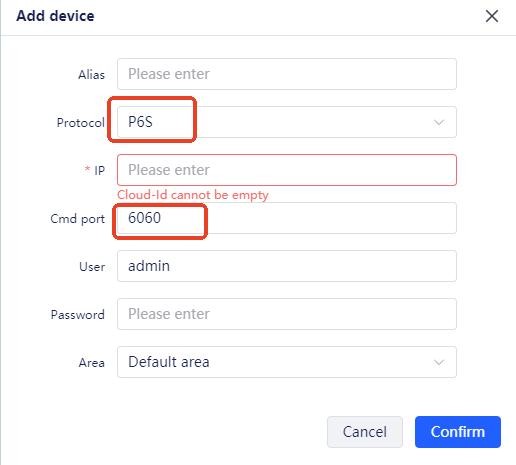
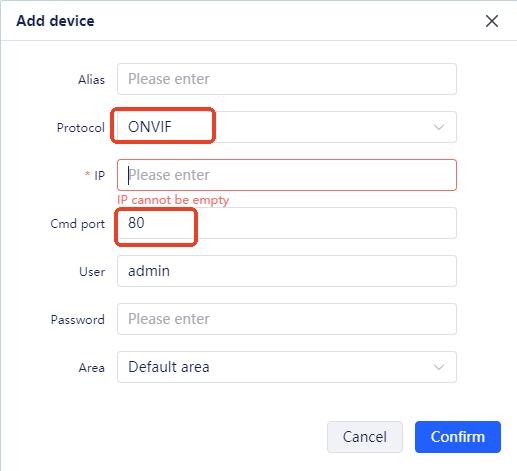
1.Manual addition: Similar to batch addition, you can add P6S protocol, P2P protocol, and ONVIF protocol devices. When adding P6S protocol or ONVIF protocol devices, enter the IP address, device
password and area. When adding P2P protocol devices, enter the device did, device password and area. The device alias is filled by default, and the filling logic is consistent with batch addition. (Note that the signaling port of the ONVIF protocol is different from that of the other two protocols)

2.Modification function: Modify the password of the device added to the area (only supports single device operation)
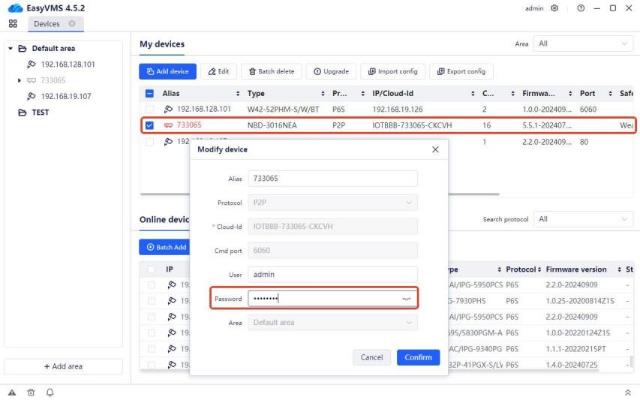
Usage scenario: It is used to modify the device password when adding devices in batches, there is a password for a specific device, but no input is made.
After the password modification is completed, the device is displayed in black, indicating the device is normal. (Note: When the device is abnormal, such as the device password is wrong, the device is displayed in red, and when the device is offline, the device is displayed in gray)
.
3.Batch deletion function: Delete devices
.

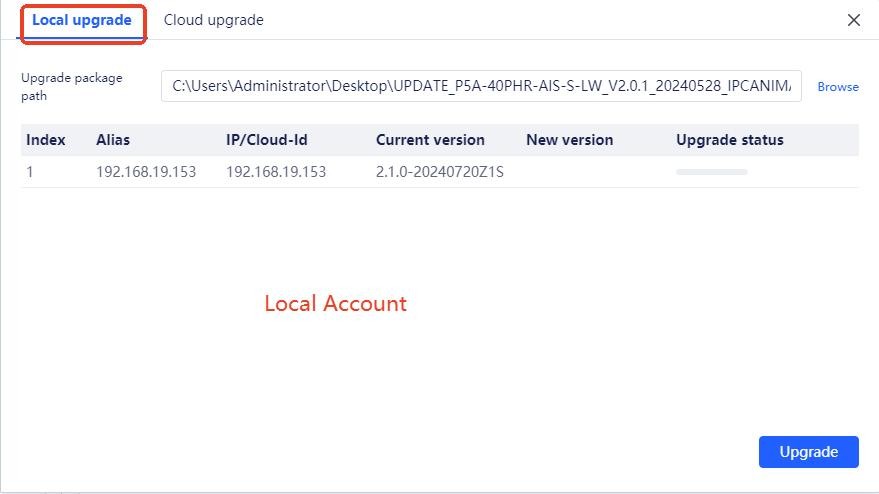
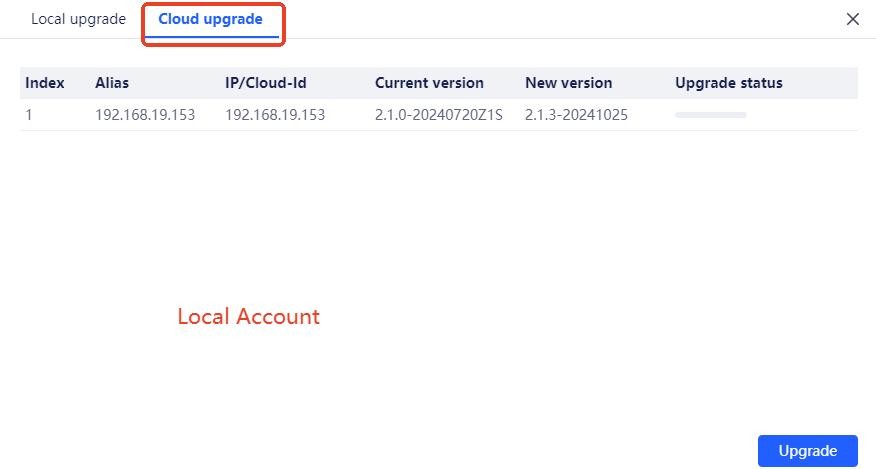
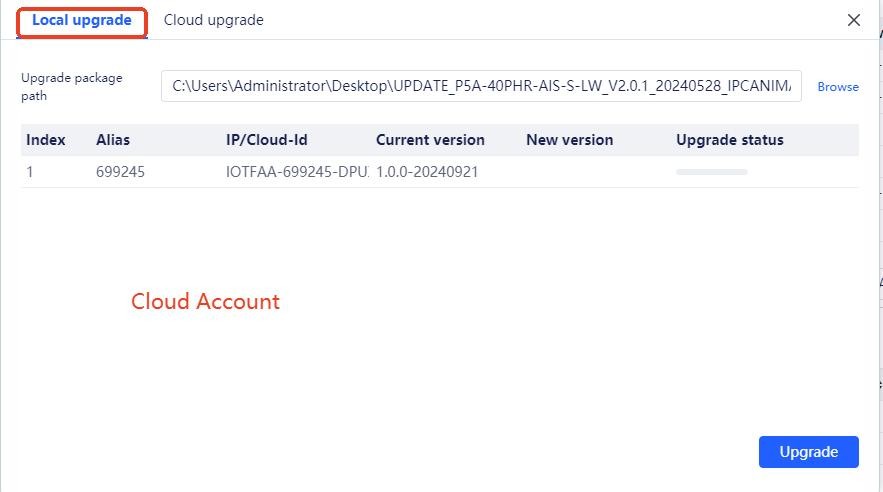
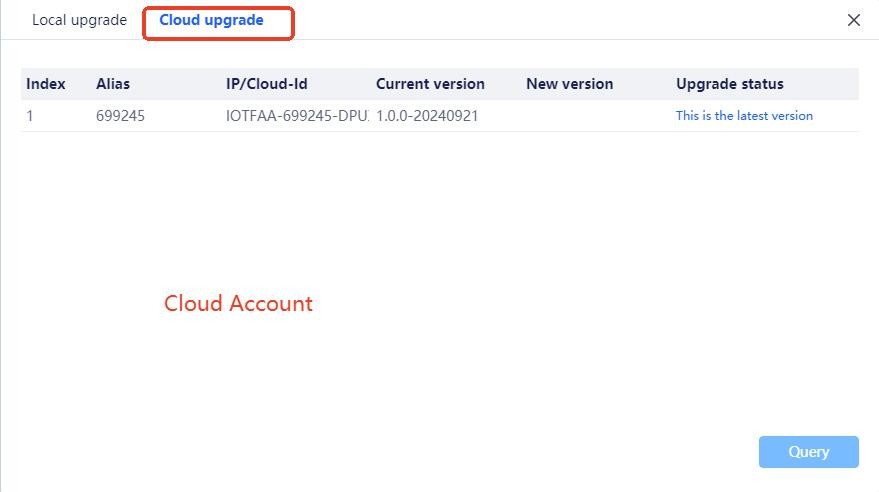
Upgrade function: Support local upgrades and cloud upgrades on the device side
.

Check the specific device and click Upgrade, and the corresponding upgrade page will be displayed. (Note: The 16002 error message here indicates that the device firmware version is too old. It needs to be manually updated to the new firmware version in recent years before it can be viewed.)
.
.
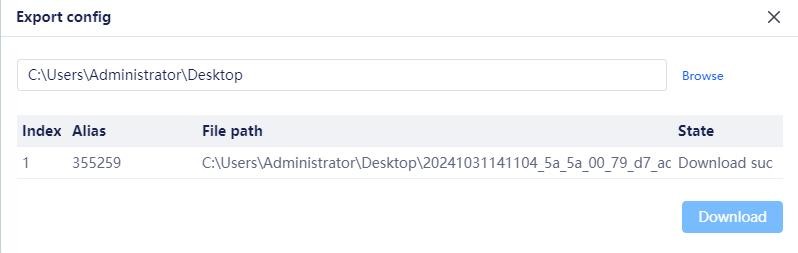
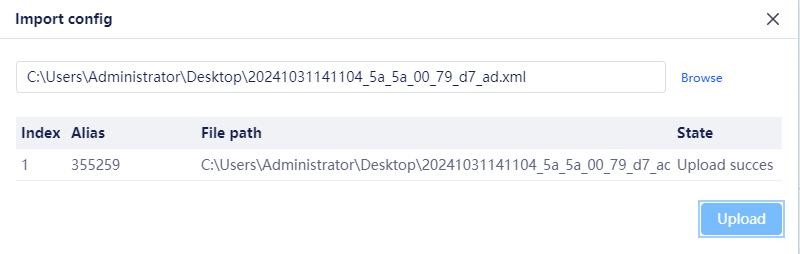
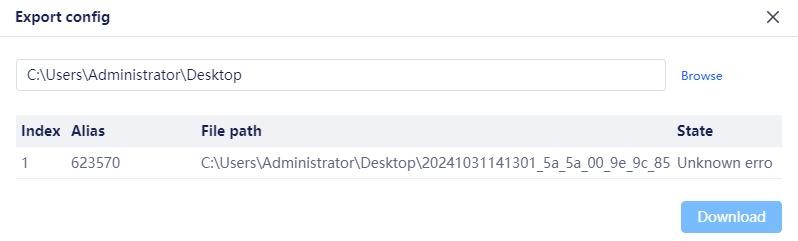
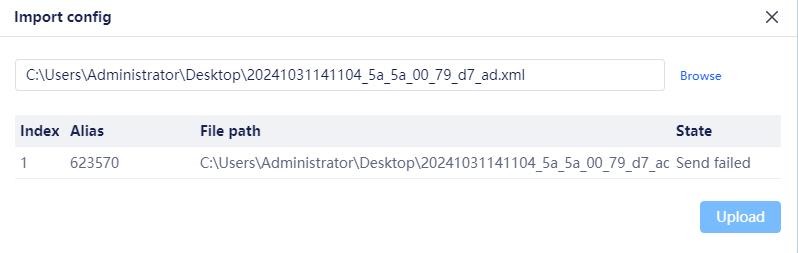
5.Batch import and export device configuration: used to synchronize device configuration information. When the device supports it, it can be uploaded and downloaded successfully. When the device does not support it, an unknown error prompt will appear.
.
.
6.
Select the added device and right-click the mouse. A prompt box will pop up to display the following functions: device configuration, synchronize time, clear events, and display QR code, as shown in the figure below:
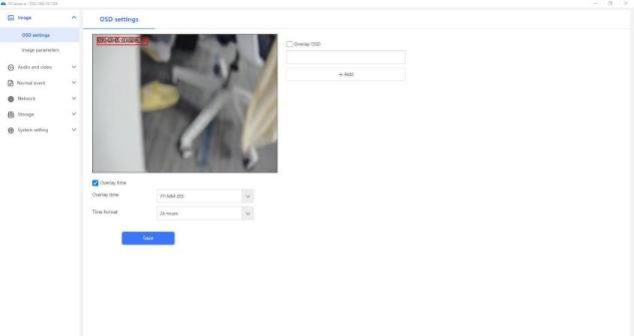
1.Device configuration: Select the device added for the corresponding protocol P6S&P2P, right-click the mouse, select [Device Configuration], and the web interface of the device configuration will pop up, as shown in the figure below:
.
2.Synchronize time: After selecting the corresponding device, click Synchronize time to automatically synchronize the device time with the computer time.
3.Clear events: After selecting the corresponding device, click Clear events, and the device will not make a beep sound.
4.Display QR code: When the current device has a did, the QR code will be displayed. When this device does not have a did, an invalid did number will be prompted. When this device is an ONVIF protocol device that does not support QR codes, it will prompt unsupported operation or interface.
.
1.4.2Real-time Preview
.
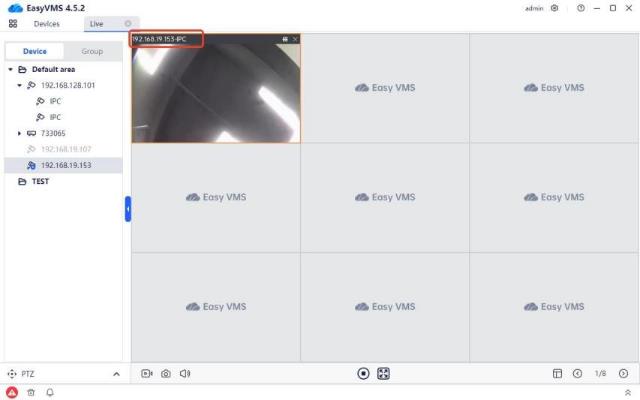
1.Open the specified preview:
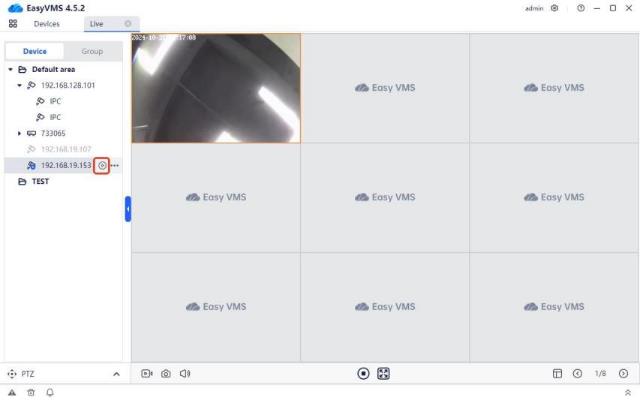
Double-click the device alias in the device list on the left or click the play icon to open the preview of all channels of the device in the preview interface on the right, as shown in the figure below:
.
.
Move the mouse over the image to display the title, which is: Device alias-channel name.
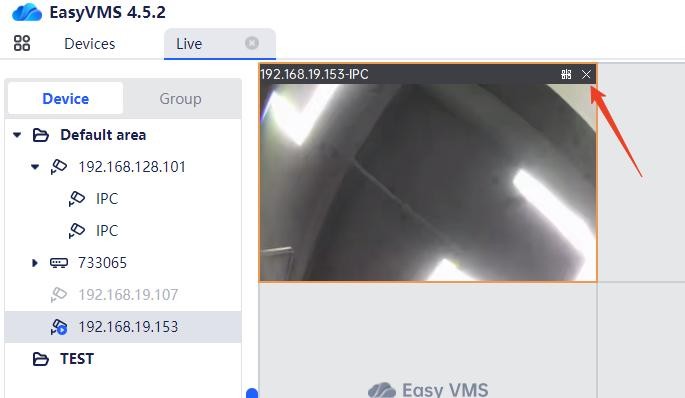
2.Close the specified preview:
Click the cross in the upper right corner of the image to close the current preview image;
Click “Close Preview” in the list that pops up when you right-click the image to close the current preview image
3.View the device DID number:

Click the QR code icon in the upper right corner of the image to view the device’s DID number and DID QR code.
4.Device list function
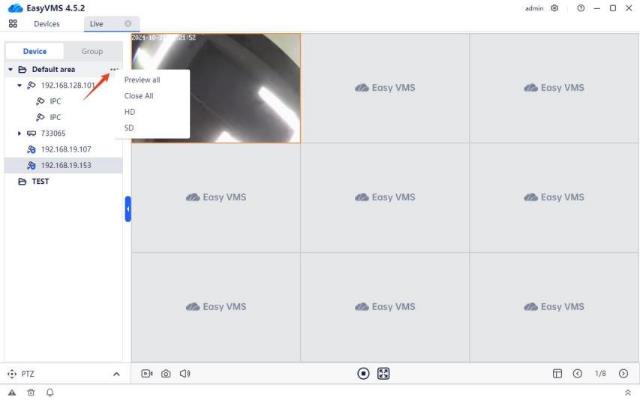
(1)Area function: Click “…” on the specified area name to expand the area function menu and control all devices in the specified area. The functions are as follows:
Preview all: open the preview images of all channels in the area;
Close all: close the preview images of all channels in the area;
HD: open the preview images of all channels in the area with HD quality;
HD: open the preview images of all channels in the area with HD quality
.
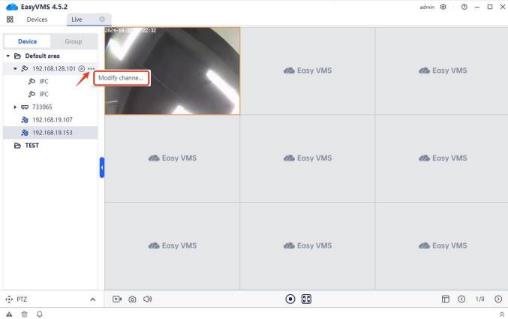
(2)Channel function: Click “…” on the specified area name to modify the channel name. The OSD is modified here
.
.
5.Preview control
There are the following function buttons on the real-time preview page:
.
.
The icon is the button to turn on/off all-channel recording. Clicking it will turn on/off all-channel recording;
![]()
![]()
![]()
The ![]() icon is the snapshot button. Clicking it will snapshot the image of all channels to the local computer;
icon is the snapshot button. Clicking it will snapshot the image of all channels to the local computer;
The ![]() icon is the audio button. Clicking it can adjust the volume of the EasyVMS client;
icon is the audio button. Clicking it can adjust the volume of the EasyVMS client;
The ![]() icon is the button to turn on/off all-channel preview. Clicking it will turn on/off all-channel preview images;
icon is the button to turn on/off all-channel preview. Clicking it will turn on/off all-channel preview images;
The ![]() icon is the full-screen switch button. Clicking it can switch to full-screen preview. In full screen mode, you can right-click “Exit Full Screen” or press the ESC key on the keyboard to exit; The
icon is the full-screen switch button. Clicking it can switch to full-screen preview. In full screen mode, you can right-click “Exit Full Screen” or press the ESC key on the keyboard to exit; The ![]() icon is the screen split button. Click it to set the number of screen splits. Currently,
icon is the screen split button. Click it to set the number of screen splits. Currently,
single screen, four screens, nine screens, sixteen screens, twenty-five screens, thirty-six screens, forty-nine screens, and sixty-four screens are supported for preview;
The ![]() icon is the button to switch to previous screen or next screen. It can be used in single screen, four screens, nine screens, sixteen screens, and twenty-five screens.
icon is the button to switch to previous screen or next screen. It can be used in single screen, four screens, nine screens, sixteen screens, and twenty-five screens.
.
6.Group patrol
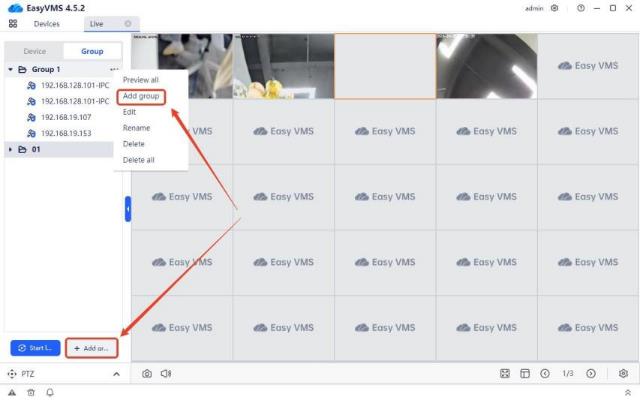
Different devices are divided into a group based on channels and regarded as a whole. After playing the real-time stream of this group for a specified time, it will automatically switch to the next group.
(1)Add group: Click the “Add Group” button or right-click and click “Add Group” to add a new group.
.
.
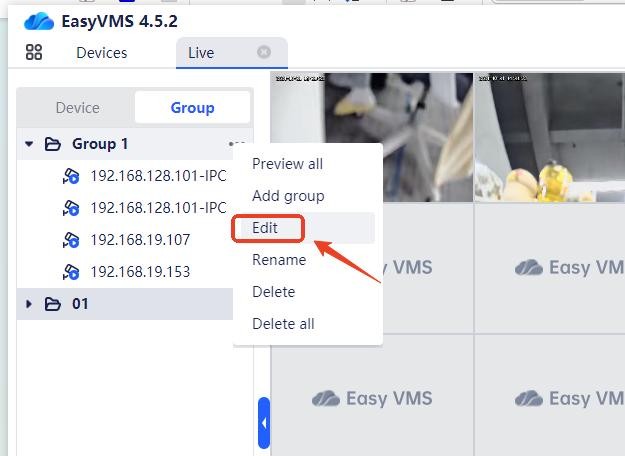
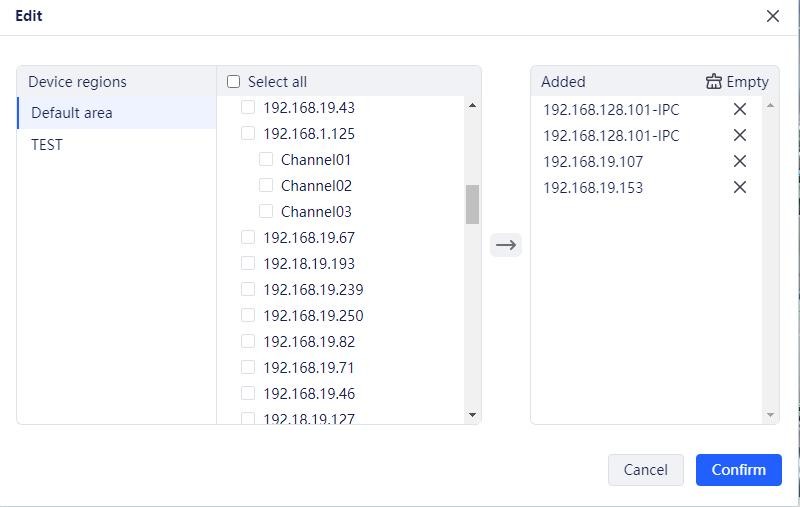
(2)Edit channel: Click “…” on the group name or right-click and click “Edit Channel” to add/remove device channels in the group, as shown in the figure:
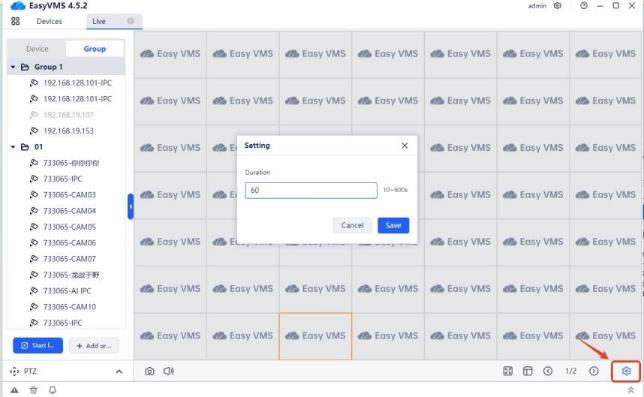
(3)Set patrol:
Click the “Start Patrol” button to start the patrol preview of the first group for a specified interval before proceeding with the preview of next group.
Click the setting icon in the lower right corner to modify the patrol time interval, as shown below:
.
.
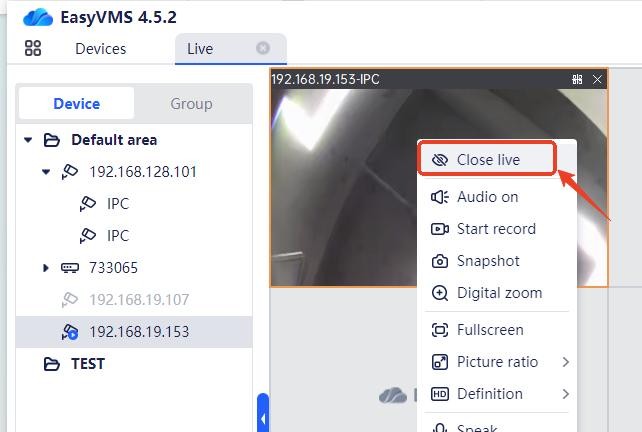
7.Right-click menu control
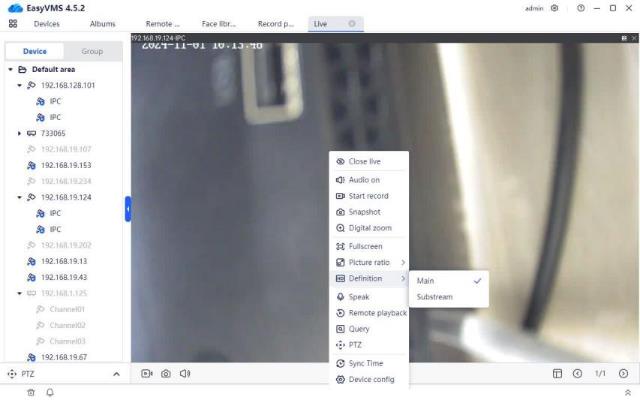
Select a single image and right-click to bring up the right-click control menu, as shown below:
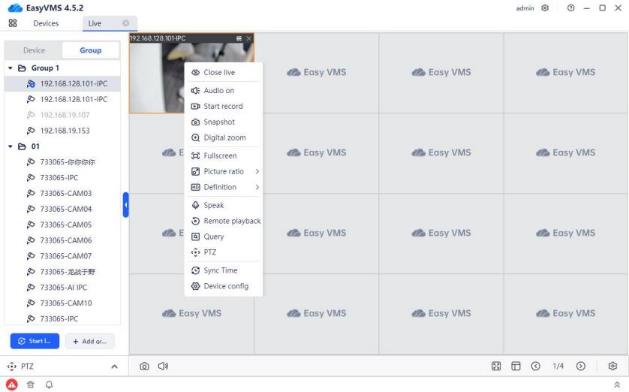
Click the [Close live] button to close the preview of the current channel; Click the [Audio on] button to enable audio preview of the current channel;
Click the [Start Recorded] button to enable single-channel recording of the current channel and save the recording locally;
Click the [Snapshot] button to enable snapshot of the current channel and save the image locally; Click the [Digital Zoom] button to electronically zoom in on the channel;
Click the [Full Screen] button to switch the preview to full screen. It is the same as the “Full Screen” function in the toolbar at the bottom of the preview operation page;
Click the [Picture Ratio] button to set the current preview aspect ratio to the original ratio or fill ratio;
Click the [Definition] button to switch the channel quality to the main stream/sub-stream (valid only for P2P (added by DID number) settings);
Click the [Speak] button to have a two-way intercom with the front-end camera;
.
Click the [Remote Playback] button to jump to the remote playback page and automatically search and play the playback of this device channel today;
Click the [PTZ Control] button to expand the PTZ panel and control the PTZ of the current channel device;
Click the [Sync Time] button to synchronize the time of the current channel with the current PC time;
Click the [Device Config] button to open the device configuration page and configure the device.
.
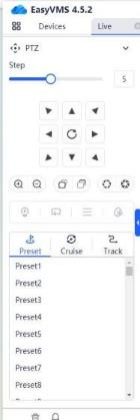
8.PTZ Control
Click “PTZ” in the lower left corner to expand the PTZ control interface and operate some PTZ-related configurations. As shown below:
.
.
1.4.3Remote Playback
.
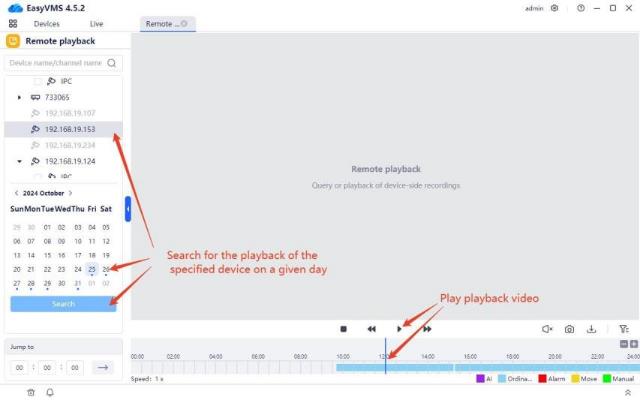
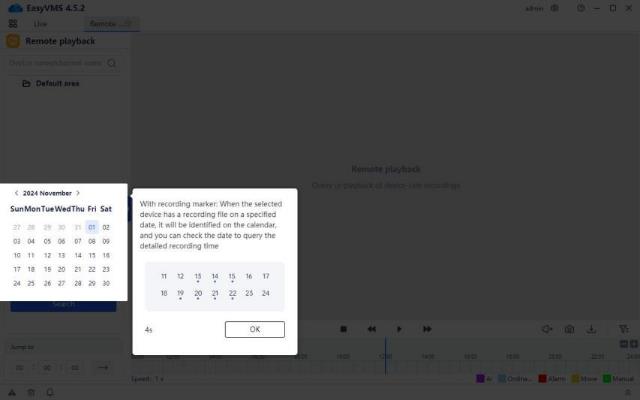
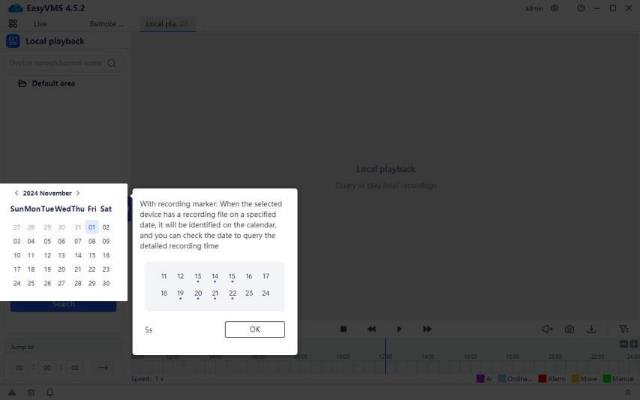
1.Search and playback:
After clicking to select the device channel, the calendar will display a small blue dot for the date with recordings. After selecting the date, click the “Search” button to find the recording. Click the play icon or double-click the time bar to play the playback video.
.
2.Multi-channel playback:
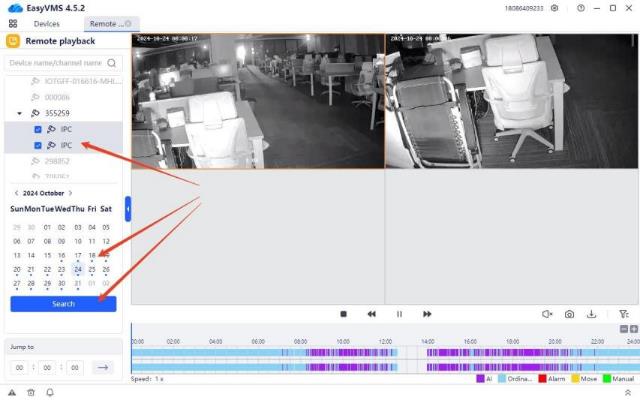 For multi-view devices and NVRs, log in to the cloud account and it’s able to play back up to 4 channels at the same time. Check the channel to be played back, select the date, click Search, and click the time point on the timeline to be played back.
.
3.Playback control:
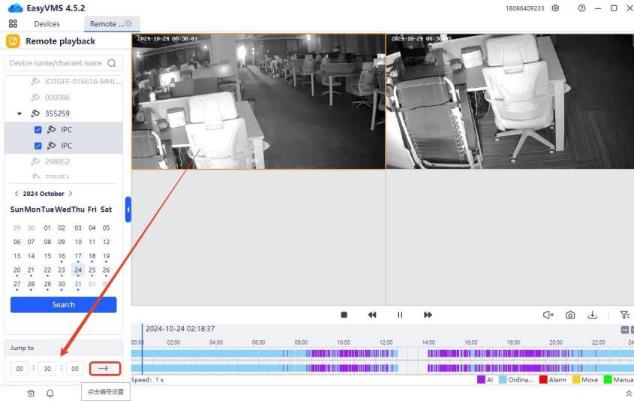
(1)Playback time point positioning: Enter the specified time point to start playing the playback
video at the specified time point. Double-clicking the specified position on the timeline can also play the playback at the specified time point.
(2)
Introduction to playback video control buttons
![]()
Stop: Stop playing the video;
Slow: Slow playback of the video, at 1/2x, 1/4x, or 1/8x speed;
Play/Pause: Play video/pause;
Fast: Fast playback of the video, at 2x, 4x, or 8x speed.
![]()
Turn on/off sound: Turn on/off the audio of the playback video;
Snapshot: Take a snapshot of the video and save it locally;
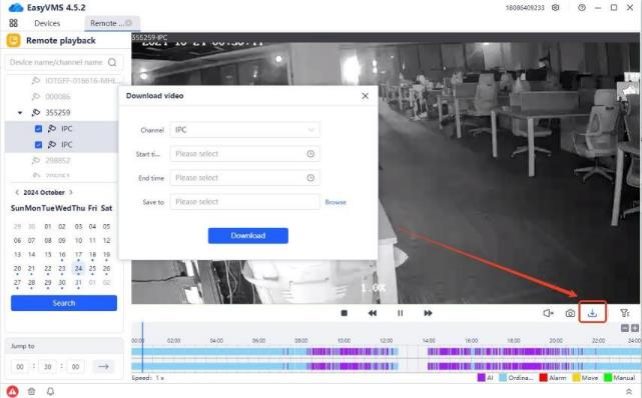
Download video: As shown in the figure, you can download a certain playback video file to your local computer.
.
.
4.Record type:
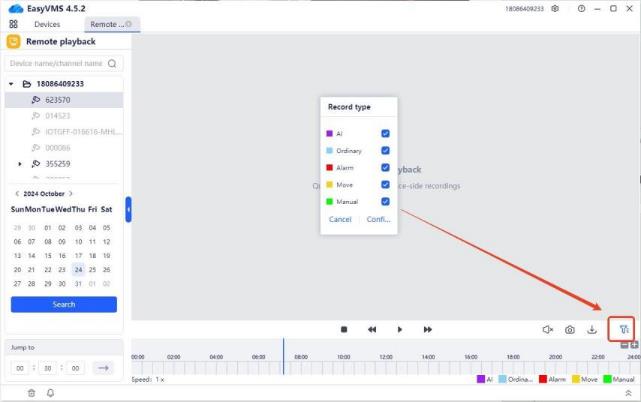
You can filter the specified video types, including AI, ordinary, alarm, move, and manual video.
5.Timeline operation:
(1)The scale on the timeline is 00:00-24:00.
(2)Move the mouse over the timeline and scroll to zoom in and out.
(3)Double-click the timeline to play directly.
.
.
1.4.4Local Playback
.
Local playback allows searching for video playback saved locally (including manual recording and scheduled recording). The usage is the same as the remote playback page.
.
.
1.4.5Local Album
.
Local album is mainly used for managing local channel snapshot and recorded files (data of scheduled recording cannot be searched).
1.File search: After selecting the file type, channel device and date, click Search to find the corresponding file.
The file types that can be filtered include: video files, image files; Supports multi-select channel device search;
Supports file search by day;
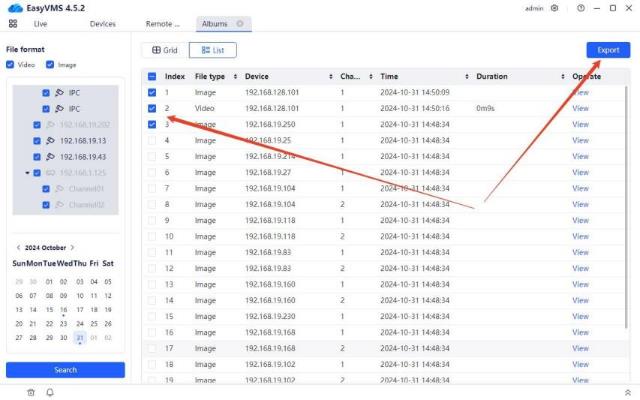
File viewing modes include: grid mode, list mode
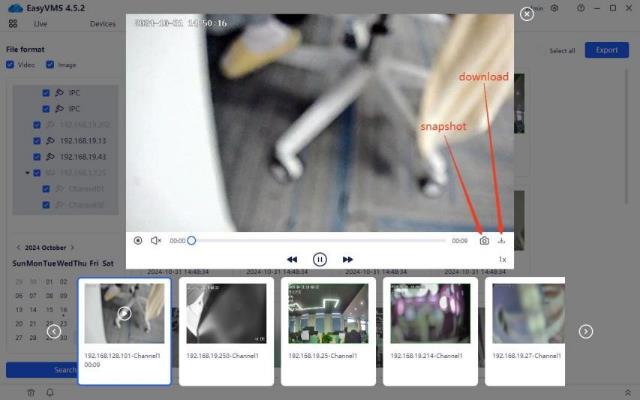
2.File viewing:
Click on the image to enlarge the image; click on the video to enlarge the video; When playing the video, you can snapshot and download it.
.
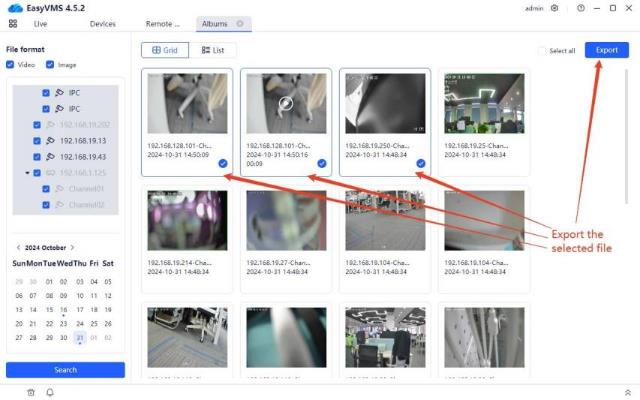
3.File export:
In grid mode and list mode, after checking the file, click the “Export” button to download the file to
the local.
.
.
1.4.6Recording Plan
.
Enable the recording plan to automatically perform local recording on the channel device.
The scheduled recording mode options are: Custom, Automatic, Disable.
1.Custom recording plan
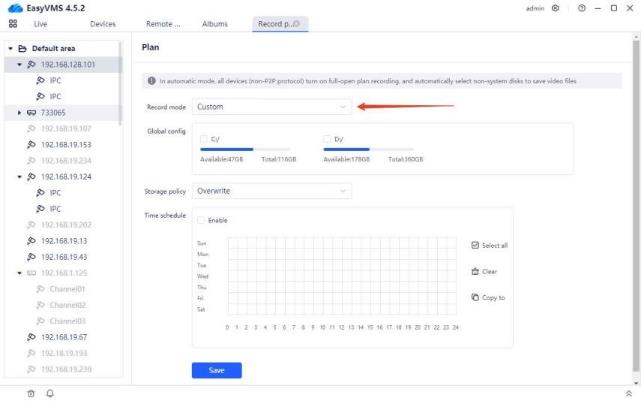
Select “Custom” for the scheduled recording mode, and customize the channel scheduled for recording, storage path, storage strategy and time.
Global configuration: The disk where the recording is saved. If you select C drive, the recording file is saved in C:\RecordPlan
Storage strategy: The measures taken when the available capacity of the selected partition is insufficient. “Loop write” means deleting from the earliest recording, reclaiming 10GB disk space, and continuing to save the latest recording. “Stop recording” means that no more recording will be performed.
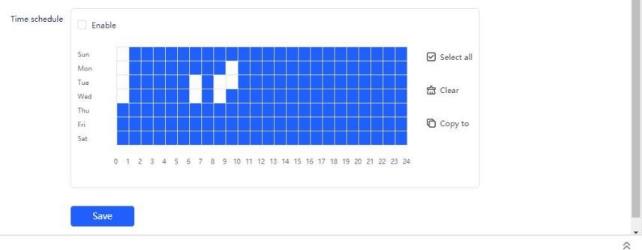
Recording time schedule: Customize the recording time, and the blue square indicates that recording is enabled during this period. Click Copy to set the scheduled recording time of the channel in batches.
2.
Automatic scheduled recording
Select “Automatic” for the scheduled recording mode, all devices (non-P2P protocol) will enable all-day scheduled recording, and the recording files will be saved in non-system disks.
3.Disable scheduled recording
Select “Disable” for the scheduled recording mode, which means that scheduled recording will not be enabled.
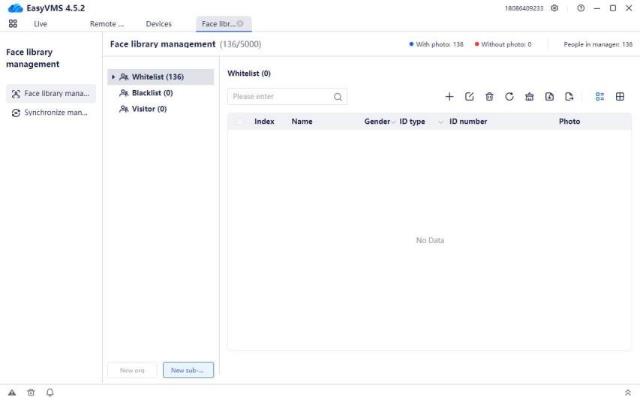
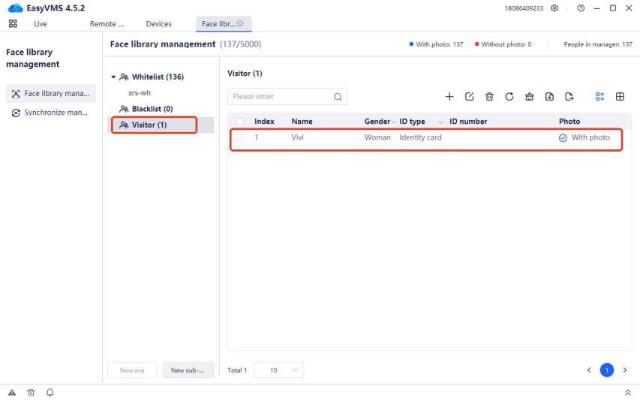
1.4.7Face library management
Click ![]() to enter the system interface, as shown in the figure below
to enter the system interface, as shown in the figure below
.
![]()
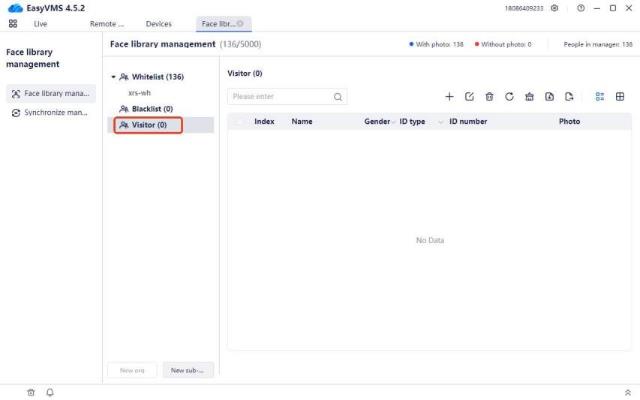
Click to enter the face database management interface. Face database management is divided into two modules: face database management and sync management, as shown in the figure below
1.Face database organization structure area: including functions such as creating new
organizations, modifying organization names, deleting organizations, and clearing organization personnel.
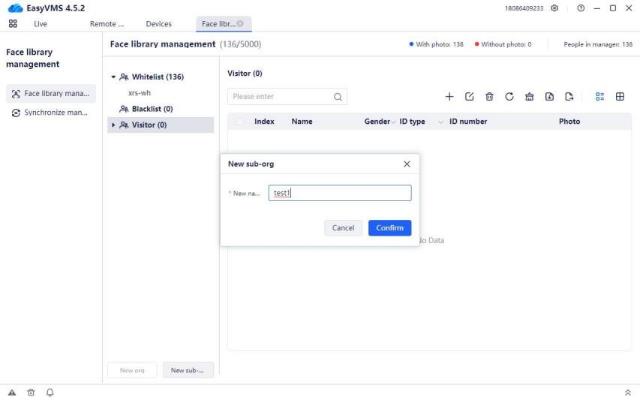
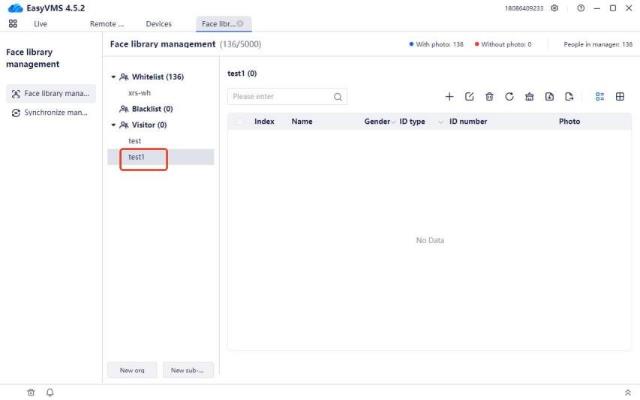
Add a subordinate organization: Click the ![]() button to enter the interface of creating a subordinate organization, enter the organization name, and click [Confirm] to create a new organization, as shown in the figure below:
button to enter the interface of creating a subordinate organization, enter the organization name, and click [Confirm] to create a new organization, as shown in the figure below:
.
.
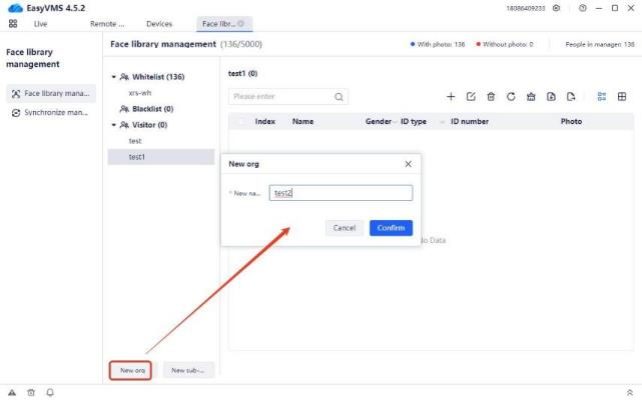
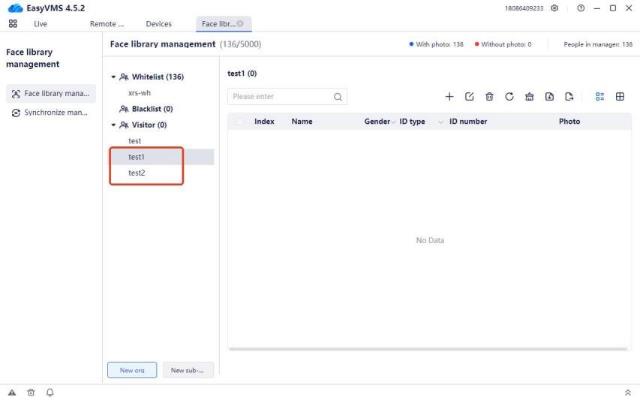
Create a new peer organization: Select the created subordinate organization, click the ![]() button to enter the interface of creating a new organization, click [Confirm] to create a new peer organization, as shown in the figure below:
button to enter the interface of creating a new organization, click [Confirm] to create a new peer organization, as shown in the figure below:
.
Note: The default organizational structure face database does not support the addition of peer
organizations, such as whitelists, blacklists, and guests.
.
Clear face database: Click the ![]() button to bring up a prompt indicating whether to “Confirm to clear the current face database”, as shown in the figure below
button to bring up a prompt indicating whether to “Confirm to clear the current face database”, as shown in the figure below
Click [Confirm] to clear all organizations under the current face database, and the personnel information is also deleted.
Click [Cancel] to not clear all face data under the current face
organization.
![]()
: Organization deletion button, delete the corresponding
![]() : Organization name edit button, re-edit the organization name.
: Organization name edit button, re-edit the organization name.
.
.
2.
Search function: Name is empty, fuzzy, and accurate query, as shown in the figure below:
.
3.Add personnel
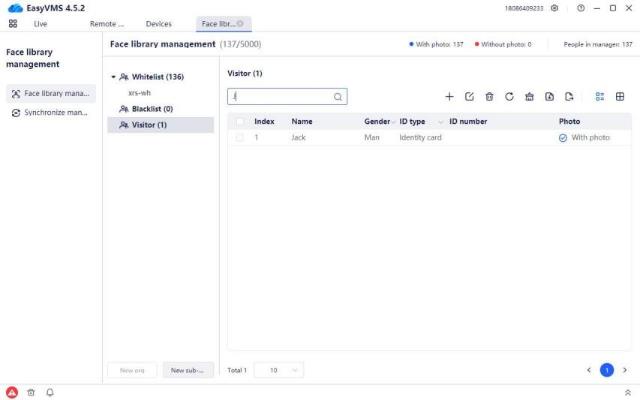
Click the button to enter the addition interface, select photo, select the personnel photo, fill in the name and other information, click [OK], and view the added personnel in the face database information list, as shown below:
.
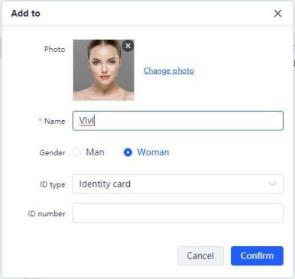
Note: Personnel cannot be added repeatedly
.
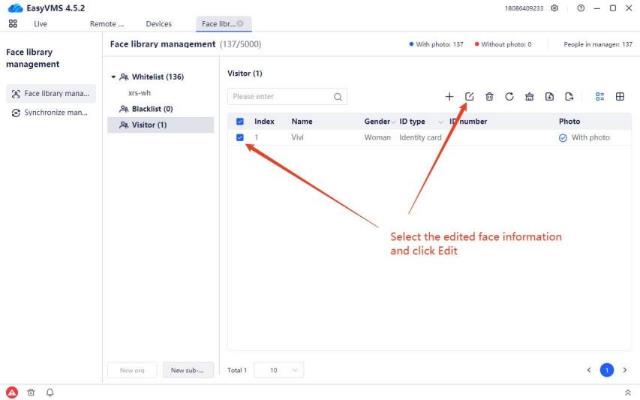
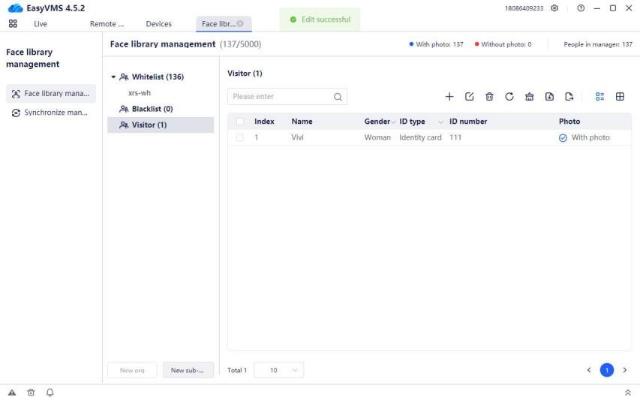
4.Edit personnel
Select the personnel to be edited, click ![]() to enter the edit interface, edit the photo, name, gender, ID type and ID number, click [confirm], and view the modified new personnel information in the personnel information list, as shown below:
to enter the edit interface, edit the photo, name, gender, ID type and ID number, click [confirm], and view the modified new personnel information in the personnel information list, as shown below:
.

.
.
5.Delete personnel
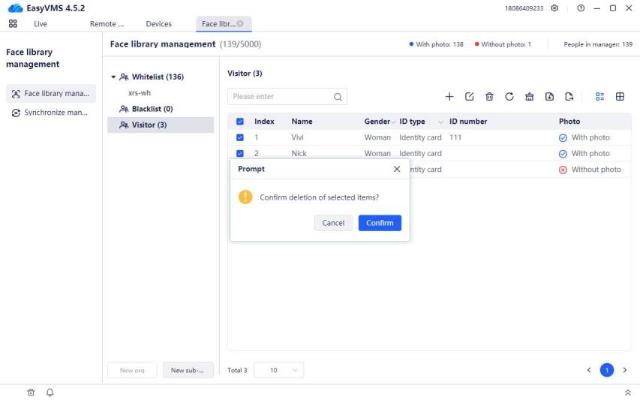
Select multiple or one personnel to be deleted, click ![]() to pop up a prompt box “Confirm to delete the selected personnel”, as shown below:
to pop up a prompt box “Confirm to delete the selected personnel”, as shown below:
Click [Confirm] to delete the selected personnel.
Click [Cancel] to not delete the selected personnel.
.
.
6.Refresh the face information list
Click the ![]() [Refresh] button to refresh the personnel information list to the latest information.
[Refresh] button to refresh the personnel information list to the latest information.
.
.
7.Clear the face database personnel
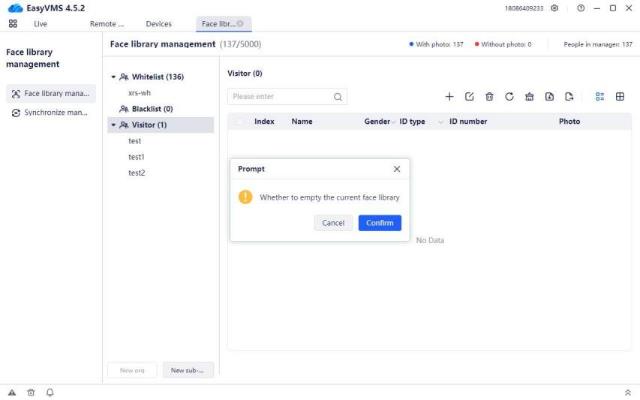
Click the ![]() [Clear] button to pop up a prompt “Confirm to clear the current organizational structure face”, as shown below:
[Clear] button to pop up a prompt “Confirm to clear the current organizational structure face”, as shown below:
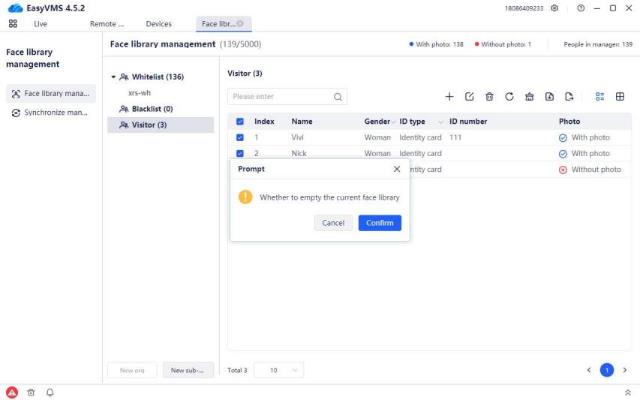
Click the [Confirm] button to clear the personnel information in the current structure face database. Click the [Cancel] button to not delete the personnel information in the current architecture face database.
Note: This clear button does not support clearing the default face database organizational structure, such as the whitelist, blacklist, and guests.
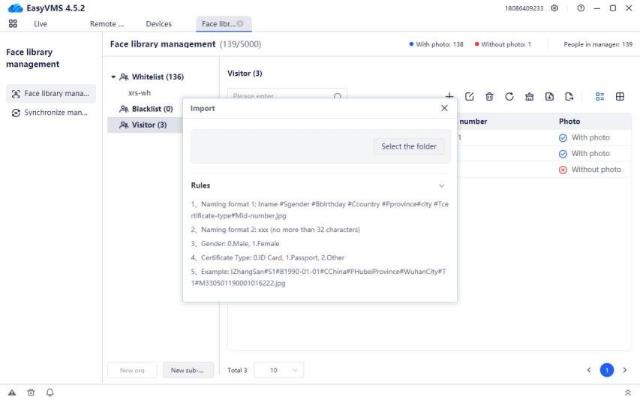
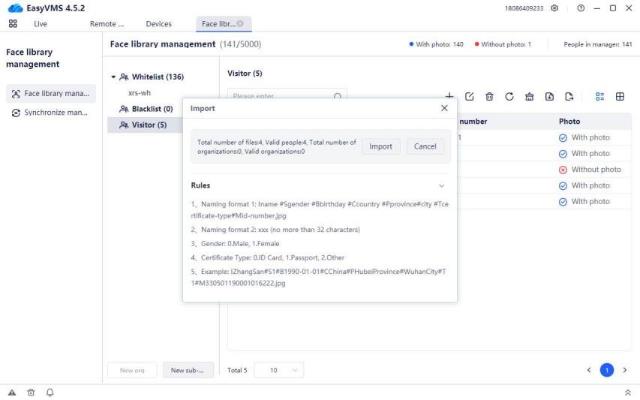
8.Batch import of personnel
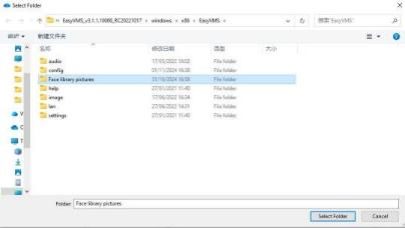
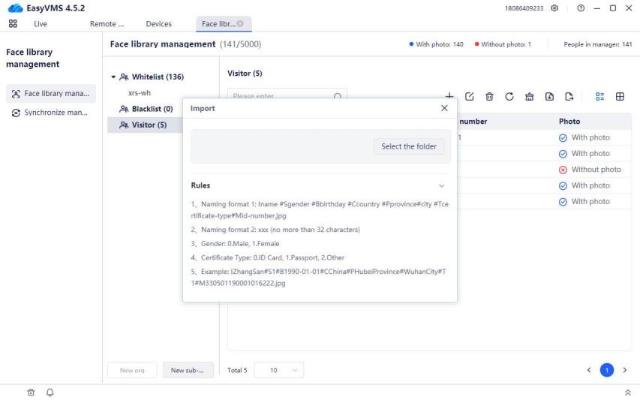
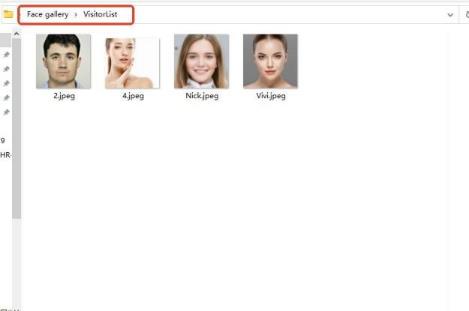
Click the ![]() button to enter the file import interface, click [Select Folder], and select the folder to be imported, as shown in the figure below:
button to enter the file import interface, click [Select Folder], and select the folder to be imported, as shown in the figure below:
.
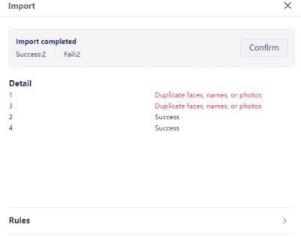
Click [Select Folder] to enter the file import interface. After the import is completed, it is shown in the figure below:
.
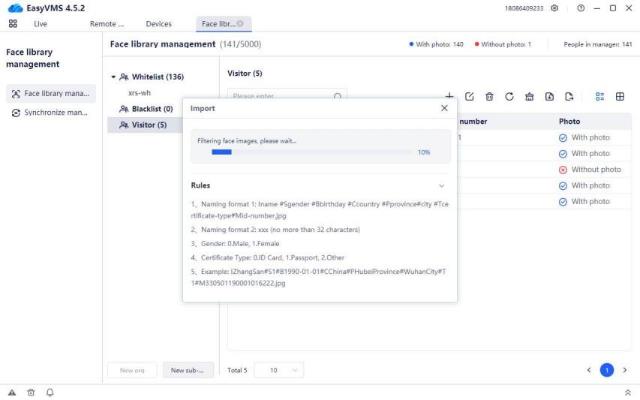
Note: Duplicate personnel cannot be imported repeatedly.
.
Click [Cancel] to re-enter the file import interface, as shown in the figure below:
.
Click [Import] to import the personnel information successfully, as shown in the figure below:
.

9.Personnel export

Click ![]() to enter the export file interface, click [Browse], and select the export path, as shown in the figure below:
to enter the export file interface, click [Browse], and select the export path, as shown in the figure below:
Click [confirm], and it will prompt “Face exported successfully”. In the directory selected on the PC,
you can view the exported face database, as shown in the figure below:
.
10.List mode
Click ![]() to display the face database personnel information in list mode, as shown in the figure below:
to display the face database personnel information in list mode, as shown in the figure below:
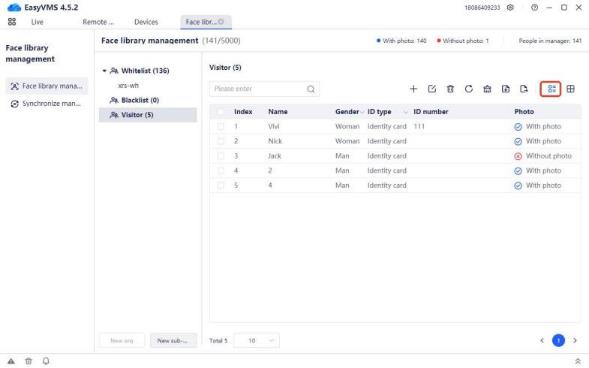
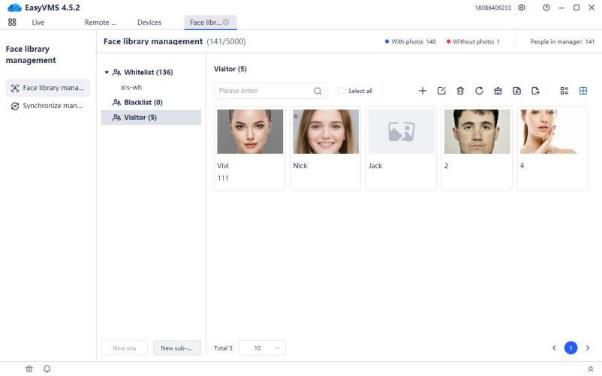
11.![]() Grid mode display
Grid mode display
.
Click to display the face database personnel information in grid mode, as shown in the figure below:
.
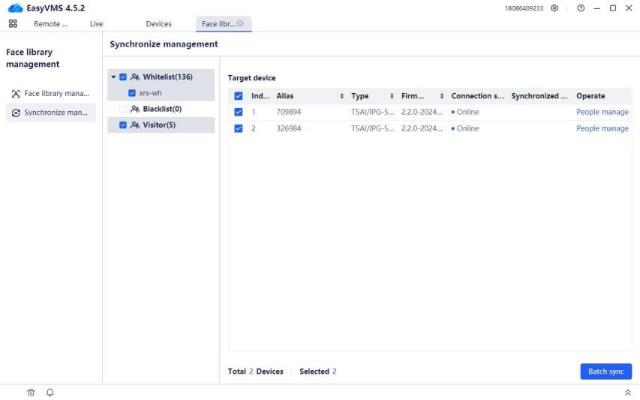
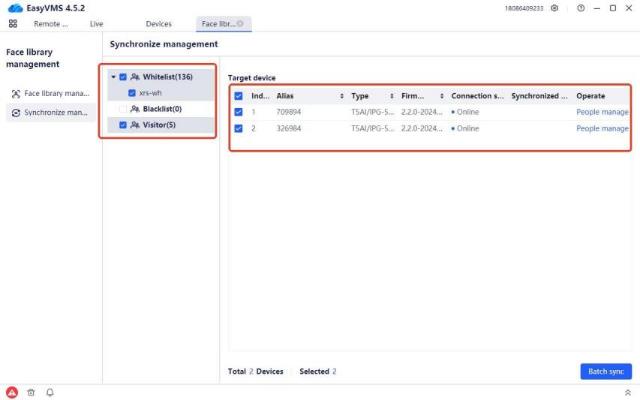
12.Sync management
Enter the sync management interface, as shown in the figure below:
.
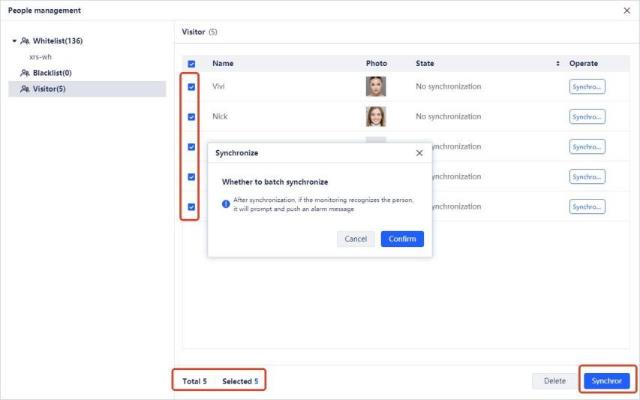
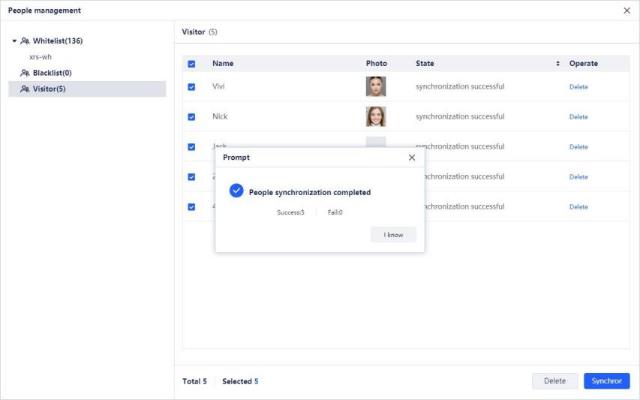
Batch delivery of equipment: Select the face database, check the device, and click [Batch delivery], as shown in the figure below:
.
![]() The sync status in the list is updated to: Synchronization successful, which means that the delivery is successful.
The sync status in the list is updated to: Synchronization successful, which means that the delivery is successful.
.
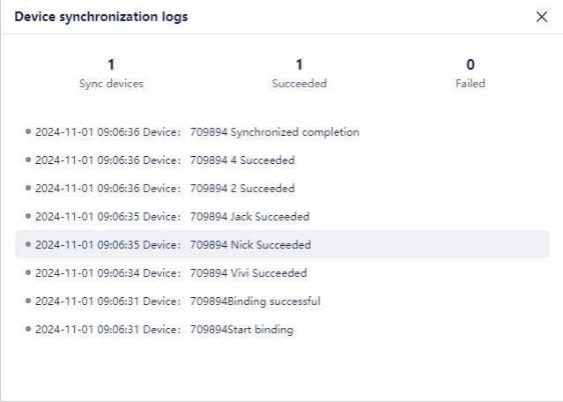
You can click the button to enter the sync log interface and view the specific log information, as shown in the figure below:
.
![]() Deliver personnel information separately: Click the button of the device to be
Deliver personnel information separately: Click the button of the device to be
delivered, enter the personnel management interface, and select the face database to be delivered in the personnel information list, as shown in the figure below:
In the personnel information list column, click Deliver to deliver personnel separately.
Check multiple personnel information and click the [Deliver] button to deliver personnel in batches, as shown in the figure below:
When the prompt “Please confirm whether to deliver control in batches” pops up, click [Confirm] to deliver the device successfully, as shown in the figure below:
Click [Cancel] to not deliver personnel information to the device.
.
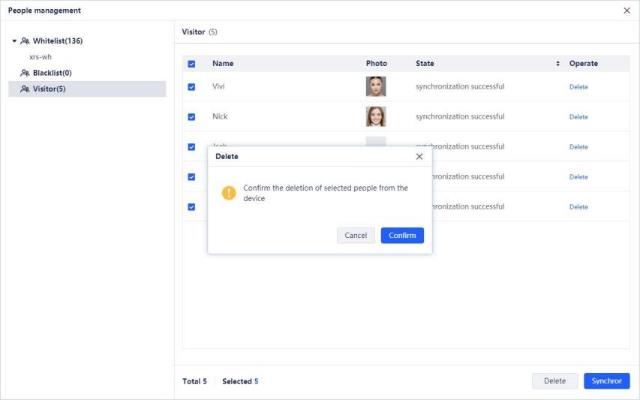
Select the personnel information, and click Cancel in the list column. The status is updated to: Cancelled successfully. You can delete the selected members from the device individually.
.
.
Select multiple personnel and click the [Cancel] button to delete the selected members from the device in batches, as shown in the figure below.
.
1.4.8Alarm Message
.
Alarm prompt box: When the added device has an event alarm turned on and an object triggers the alarm event information of the corresponding device, the tool side will synchronously display the corresponding event in the corresponding drop-down box. The display picture is as follows
![]()
Expand the alarm prompt box to see the event source, event time, event details and snapshot module.

.
1.![]() Alarm button: Prompts that there is new alarm event information.
Alarm button: Prompts that there is new alarm event information.
2.![]() Trash can button: Click to clear the currently displayed event information.
Trash can button: Click to clear the currently displayed event information.
3.![]() Speaker button: Sound prompts that there is new event information.
Speaker button: Sound prompts that there is new event information.
4.
View button: Click to view the corresponding face recognition picture snap shot by the device.
1.4.9Parameter Setting
.
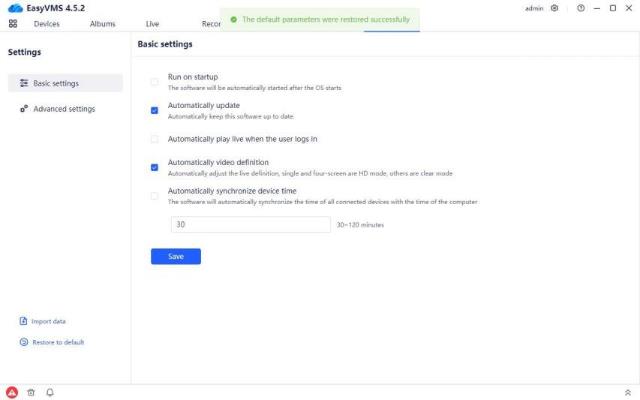
Parameter setting is divided into two setting modules: basic settings, advanced settings, import old version data and playback default parameters. By default, basic settings are displayed when you click into the page from the system navigation.
.
Basic settings include: auto–start, automatic version update, automatically open video when user logs in, automatic adjustment of video resolution, automatically synchronize device time and save button.
Note: Parameter settings are effective for the entire tool and are displayed regardless of account. The default parameter check status of basic settings is shown in the figure below.
.
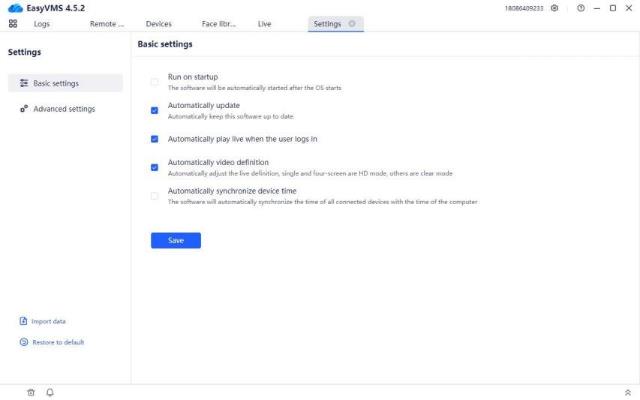
1.Auto-start: Check this parameter, save it, and the next time the computer starts, the corresponding function will be started with the computer.
2.Automatic version update: Check this parameter, save it, and when there is a version update, a button corresponding to the upgrade icon will be displayed in the upper right corner. Click to upgrade. The flow during upgrade is as shown in the figure below
.
3.Automatically open video when user logs in: Check this parameter, save it, and when the account (local account or cloud account) is successfully logged in, the added device will automatically open the corresponding real-time preview stream in the real-time preview module. When the preview stream of the corresponding device has reached the upper limit and the corresponding preview page cannot be opened normally, the corresponding “device alias + channel name” prompt will be given to inform that the preview stream of this device has reached the upper limit.
4.Automatically adjust video resolution: Check this parameter, save it, and the device’s video
resolution will be automatically adjusted when the device page is switched to single or quad-screen. It will switch from the resolution of the sub-stream to the resolution of the main stream. (Note: This function is supported by devices added by P6S protocol or ONVIF protocol. Devices added in the cloud account are P2P protocol devices and do not support this function.)
5.Automatically synchronize device time: Check this parameter to set the time range, and automatically synchronize the device after saving. The time range is 30 minutes to 120 minutes. When set to 30 minutes, the device time will be automatically synchronized every 30 minutes.
.
Advanced settings include: automatically add LAN devices, automatically open video when adding devices, play sound reminders for new events, play videos without video signals, setting items and save button.
.
The default parameter check status of basic settings is shown in the figure below.
.
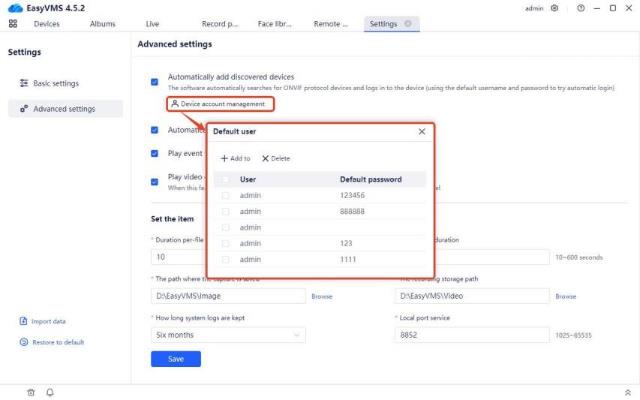
1.Automatically add LAN devices: Support clicking to log in to device account management and add the username and password of known ONVIF devices. When the username and password of the real device are written, check this parameter and save it. When the LAN online device in the device management detects the corresponding device with ONVIF protocol, it will try to match and add it with the username and password added in the device account management here. When the match is successful, the corresponding device will be added to the added device list normally. If the username and password cannot be matched, the corresponding searched ONVIF protocol device cannot be added normally. (Note: This function only supports ONVIF protocol devices)
.
2.Automatically open video when adding devices: Check this parameter, save it, and add the device in the device management. When the device is added to the area in normal state, the real-time preview area will actively open the real-time stream of the corresponding device. When the real-time stream of this device is opened to the upper limit, it will also give a prompt that the real-time stream of the corresponding device has reached the upper limit.
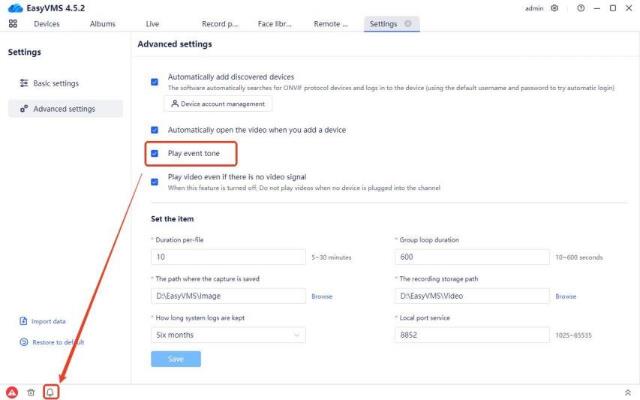
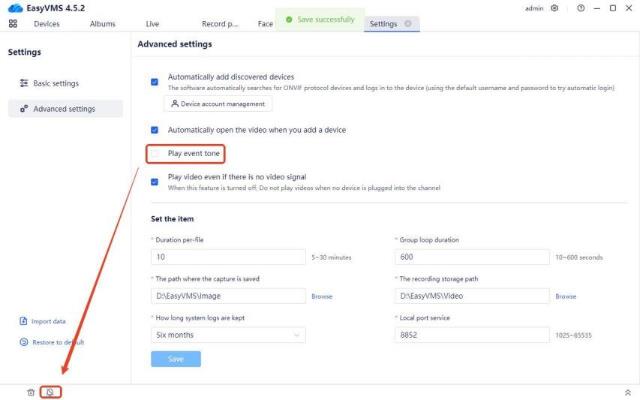
3.Play sound reminders for new events: Check this parameter, and save it. When the added device has an event alarm turned on and an object triggers the alarm event information of the corresponding device, the tool will synchronously display the corresponding event in the corresponding drop-down box and issue an alarm prompt. After unchecking this parameter, the corresponding alarm is pushed normally, but the alarm prompt sound is turned off, and the corresponding bell button displays the mute state.
(Note: The “Play sound reminders for new events” here and the disabled state of the bell are not mandatory. When the user turns on the new event sound reminder, but there are too many alarm prompts, simply click the bell button to disable and mute it directly.
The priority of the externally disabled bell here is higher than the default parameter priority. Therefore, when this parameter is checked, but the corresponding bell is in the disabled state of manual operation, the sound prompt of the corresponding event cannot be heard.)
.
4.Play videos without video signals: Check this parameter, save it, and click an NVR device for real-time preview. The channel video with blue screen in the corresponding NVR will be displayed normally. When this button is unchecked and all added device videos are opened in the real-time preview with one click, the blue screen device that has been added but cannot play the video will be automatically skipped.
5.Setting items: used to control the file path, file size saving time and port number used for service connection generated by the parameters of the real-time preview module.
The corresponding specific parameters are: single file recording duration, patrol interval, snapshot storage path, video storage path, system log storage duration, local port service and save button.
1.Single file recording duration: set the upper limit file size of the real-time preview video file. The support range is 5 minutes to 30 minutes.
2.Patrol interval: set the corresponding time of the patrol interval. When the number of groups for real-time preview patrol is greater than 1, the patrol waiting time interval between groups is controlled by this parameter. The parameter range of the patrol interval is 10 seconds to 600 seconds.
3.Snapshot storage path: set the real-time preview page, and the file data will be saved in that file directory after clicking the snapshot. The default path is: C:\EasyVMS\Image.
4.Video storage path: set the real-time preview page, and the file data will be saved in that file directory after clicking the video. The default path is: C:\EasyVMS\Video.
5.System log storage duration: how long the default saved system log can be retained. The time options are one month, three months, and six months.
6.Local port service: service port, used to check device information. Support port range (1025 to 65535).
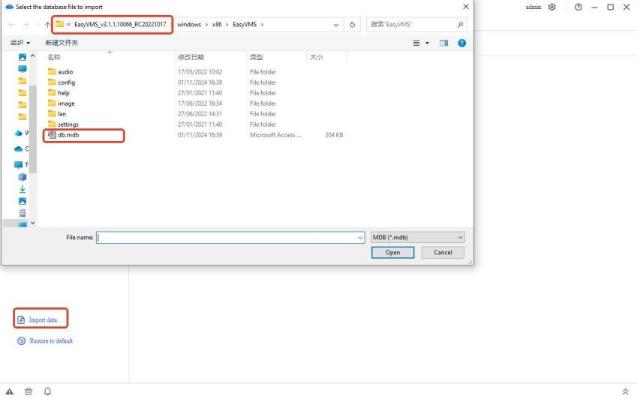
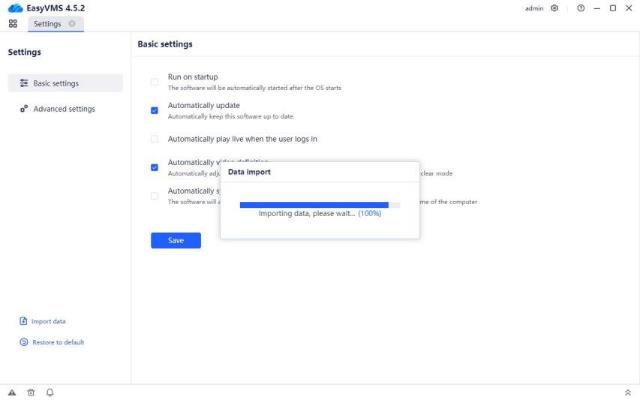
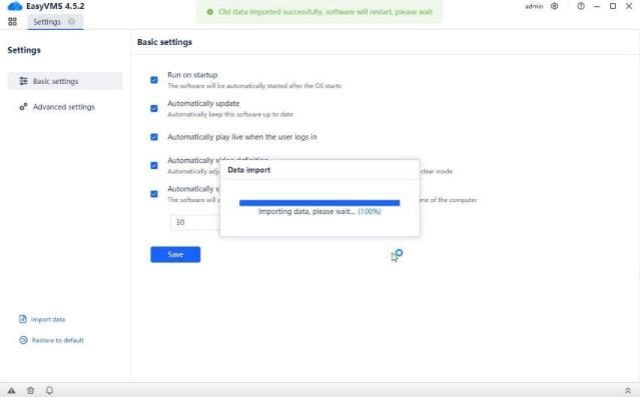
6.Import old version data function: If the previous version of VMS is installed on the current computer and you want to import the old data with one click, click this function, find the database of the old version tool and click to open it. (Note: Importing the old version data here will only import the previous data information of the local account, and the cloud account does not need to import data.)
The import progress bar will appear. After the import is completed, the VMS tool will be restarted and a restart prompt will be given. After logging in normally, the device information of the old version can be found in the added devices in the device management.
(Not: Eski sürüm verilerinin içe aktarılması sistem önyükleme istemini sıfırlayacaktır. İlgili sistem önyükleme istemi yeniden bir önyükleme açılır penceresi gösterecektir. Kullanıcı ilgili önyükleme istemi kutusundaki açılır pencere bilgisine tıkladığında önyükleme istemi kaybolacaktır.
(Eğer açılan sayfaya tıklamazsanız, açılan kutu 5 saniye sonra otomatik olarak kaybolacaktır, ancak araç bir sonraki başlatıldığında tekrar uyarı verecektir.)
Eski sürüm veri içe aktarma işlem şeması:
.
.
Not: İçeri aktarılan veri 3.x sürümündeki bir veritabanıdır. 4.0 ve üzeri sürümdeki veritabanı içeri aktarılamaz.
.
Araca tekrar giriş yapın, ilgili sayfaya tıklayın ve komut istemi penceresinin şematik diyagramı açılacaktır.
.
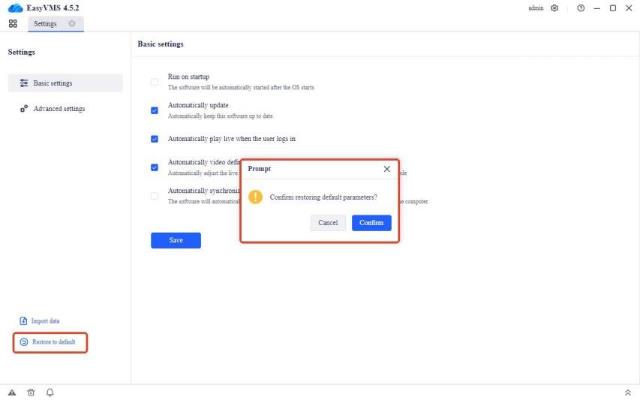
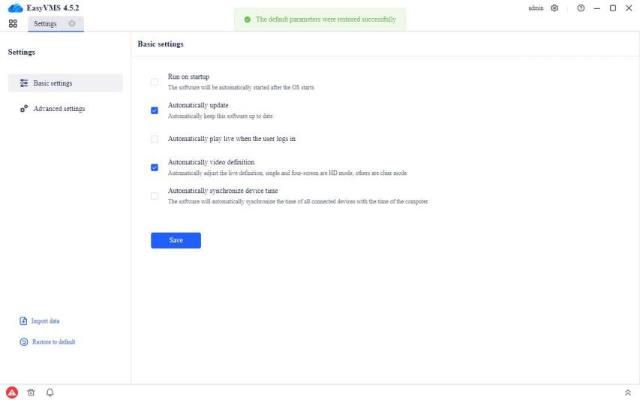
7. Varsayılan parametreleri geri yükle: Bu parametreye tıkladıktan sonra, işlemi onaylamak için ikincil bir açılır pencere görüntülenir. Onayın ardından, parametre ayarlarındaki tüm veriler tek bir tıklamayla varsayılan başlangıç değerlerine geri yüklenir.
.
.
1.4.10Kullanıcı Yönetimi
.
1. Kullanıcı yönetimi işlevi: Yerel oturum açma için mevcut hesap bilgilerini yönetin. Misafir ve operatör hesaplarının eklenmesine/silinmesine izin verin.
Not: Yalnızca yönetici parolası değiştirilebilir ve yönetici hesabı silinemez (örneğin
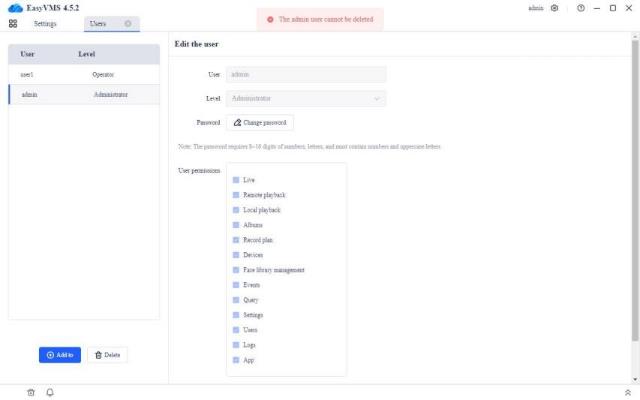
Eklenen hesap için kullanıcı adı ve şifre doldurulmalı ve şifre güvenli olmalıdır. VMS hesabının şifresi 8-16 haneli ve harfli olmalı, rakam ve büyük harf içermelidir.
2.Yönetici hesabı izinleri: tüm işlevler
3.Operatör hesabı izinleri: gerçek zamanlı önizleme, uzaktan oynatma, yerel oynatma, sistem günlüğü
4.Misafir hesabı izinleri: gerçek zamanlı önizleme
.
1.4.11Sistem Günlüğü
.
1.Kullanıcı seçimi: Araç tarafında ilgili hesaba ait işlem kayıtlarını kullanıcı hesabına göre filtreleyebilirsiniz.
(Not: Buradaki kullanıcılar, kullanıcı yönetimindeki mevcut hesaplar olmalıdır. Kullanıcı yönetiminde yalnızca bir hesap varsa, o da varsayılan hesap yöneticisi ise, kullanıcı açılır kutusunda yönetici dışında bir kullanıcı bulunamaz)
.
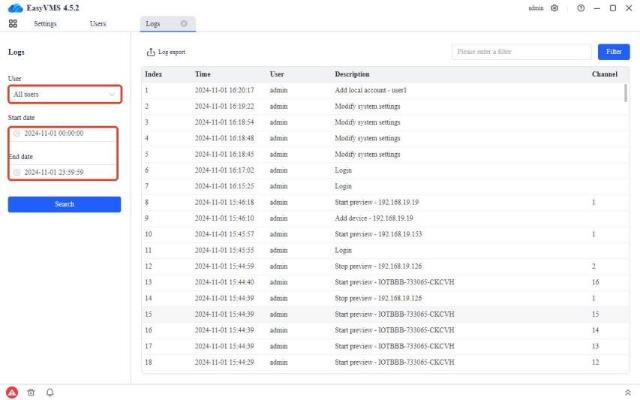
2. Filtre:
A.Zamana göre filtreleme: Başlangıç ve bitiş zamanına göre filtreleme.
B.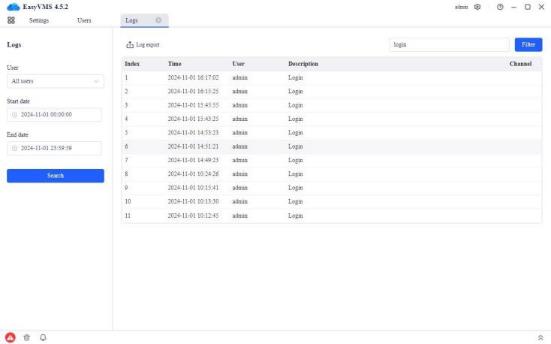
Ada göre filtreleme: Günlük, ad filtrelemeyi destekler. İlgili açıklama anahtar sözcüklerini girdiğinizde, ilgili günlük işlemini arayabilirsiniz (aşağıdaki şekilde gösterildiği gibi).
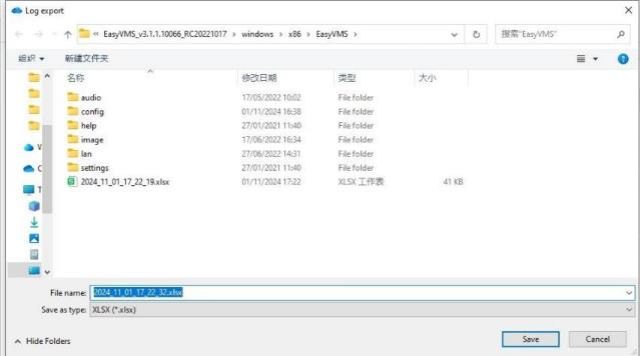
3. Günlük dışa aktarma işlevi: Aranan günlük verileri dışa aktarılabilir. Dışa aktarılan dosyalar için özel yol ve özel ad desteklenir. Varsayılan dosya adı “yıl_ay_gün_saat_dakika_saniye.XLSX”tir. Örnek aşağıdaki şekilde gösterilmiştir.
.
.
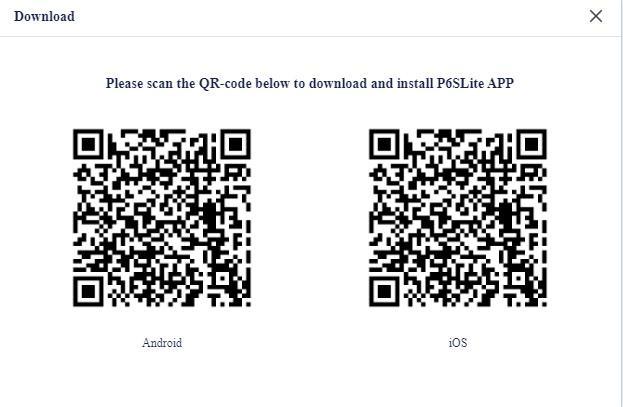
1.4.12Uygulamayı indirin
.
Uygulamayı indirmek için tıklayın, P6SLite APP indirme QR kodlarını IOS ve Android için görüntülemek üzere bir açılır pencere açılacaktır.