
Most consumers need a professional IP-based security camera system for their home, business or property, but it is assumed that IP systems are complex and very heavy. This discourages them from buying and hinders the security they need. The truth is, setting up an IP camera is easier than you might think. It includes a basic understanding of networking and by following some simple steps you will get your IP cameras up and running in no time.
An IP camera can be directly connected to your network or computer and there are three ways to do this. The three ways listed below do not require an NVR. An NVR or Network Video Recorder is the device to which IP cameras are connected. The NVR records the video provided by the IP cameras to a HD (720p, 1080p), 2K HD or 4 Ultravah (4K) hard drive, depending on the type of NVR and the type of camera used with it.
Although IP cameras are network-based cameras, they do not require Internet access to be used as they are stand-alone devices that can be used on a local network. A simple local network can be one of the following:
- An IP network camera connected with a network cable to your desktop computer’s network port.
- An IP camera connected to a router connected to a desktop or laptop computer, but the router is not connected to the internet.
However, if you want to view your system remotely from the internet, you must connect the system to the Internet.
Do I need an NVR for IP security camera system?
An NVR is not required to view your network cameras or even record video. If you are testing cameras, looking for a temporary setup, or want to set up something cheap, you can use a computer with an IP camera to create a good alternative to an NVR. SmartPSS is our computer software program that allows PCs to view and record IP cameras. However, this type of processing will demand a lot from computers. Most likely, you will not be able to use this computer for personal use as it will be congested to process video from high resolution IP network cameras. Also, computers can be unreliable and crash, potentially leaving you without the recorded video.
NVR products are stand-alone devices using a Linux operating system known to be robust and accident-free, designed to operate 24/7 and protect system security with user account access permissions. For a complete security camera system, you’ll want to use an NVR along with the cameras. The SmartPSS software can be used as a client software for viewing cameras connected to and connected to the NVR from a PC and playing / downloading recorded security footage.
Three ways to connect the IP camera to a computer
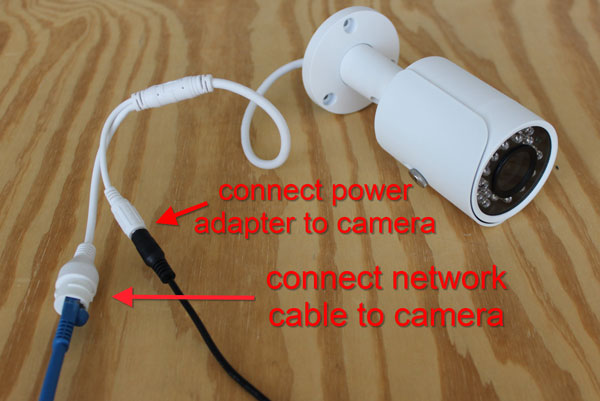
Before we begin, it is important to understand that network camera systems require the ability to carry video and power to function properly. Power Over Ethernet (PoE) is a technology that transmits video / data signal and power over an Ethernet cable. In cases where PoE is not available, a 12V DC power adapter will be required to power the camera.
Second, you will need to use the IP finder Config Tool to find the cameras on your network. To learn more about the basic knowledge of how IP addresses matter when using network cameras, please read our guide on connecting security cameras to the internet.
Let’s now discuss three ways to connect an IP camera from your computer.
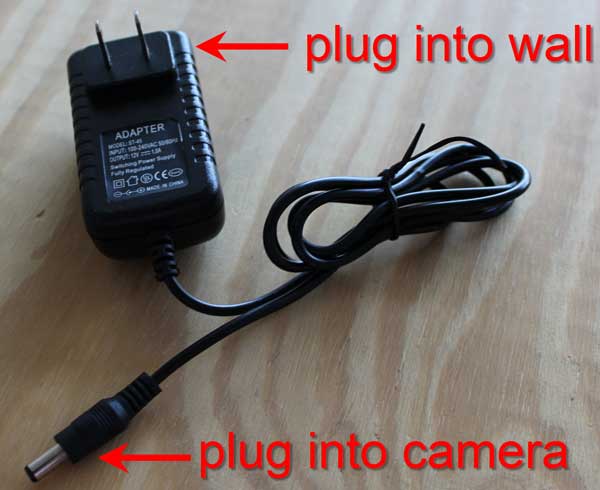
1) 12V DC power adapter directly into a PC with a network cable
a) For this method, we will power the camera using a 12V DC 1amp power adapter that plugs into a 110V AC outlet. Below is the picture of the reliable power adapter.
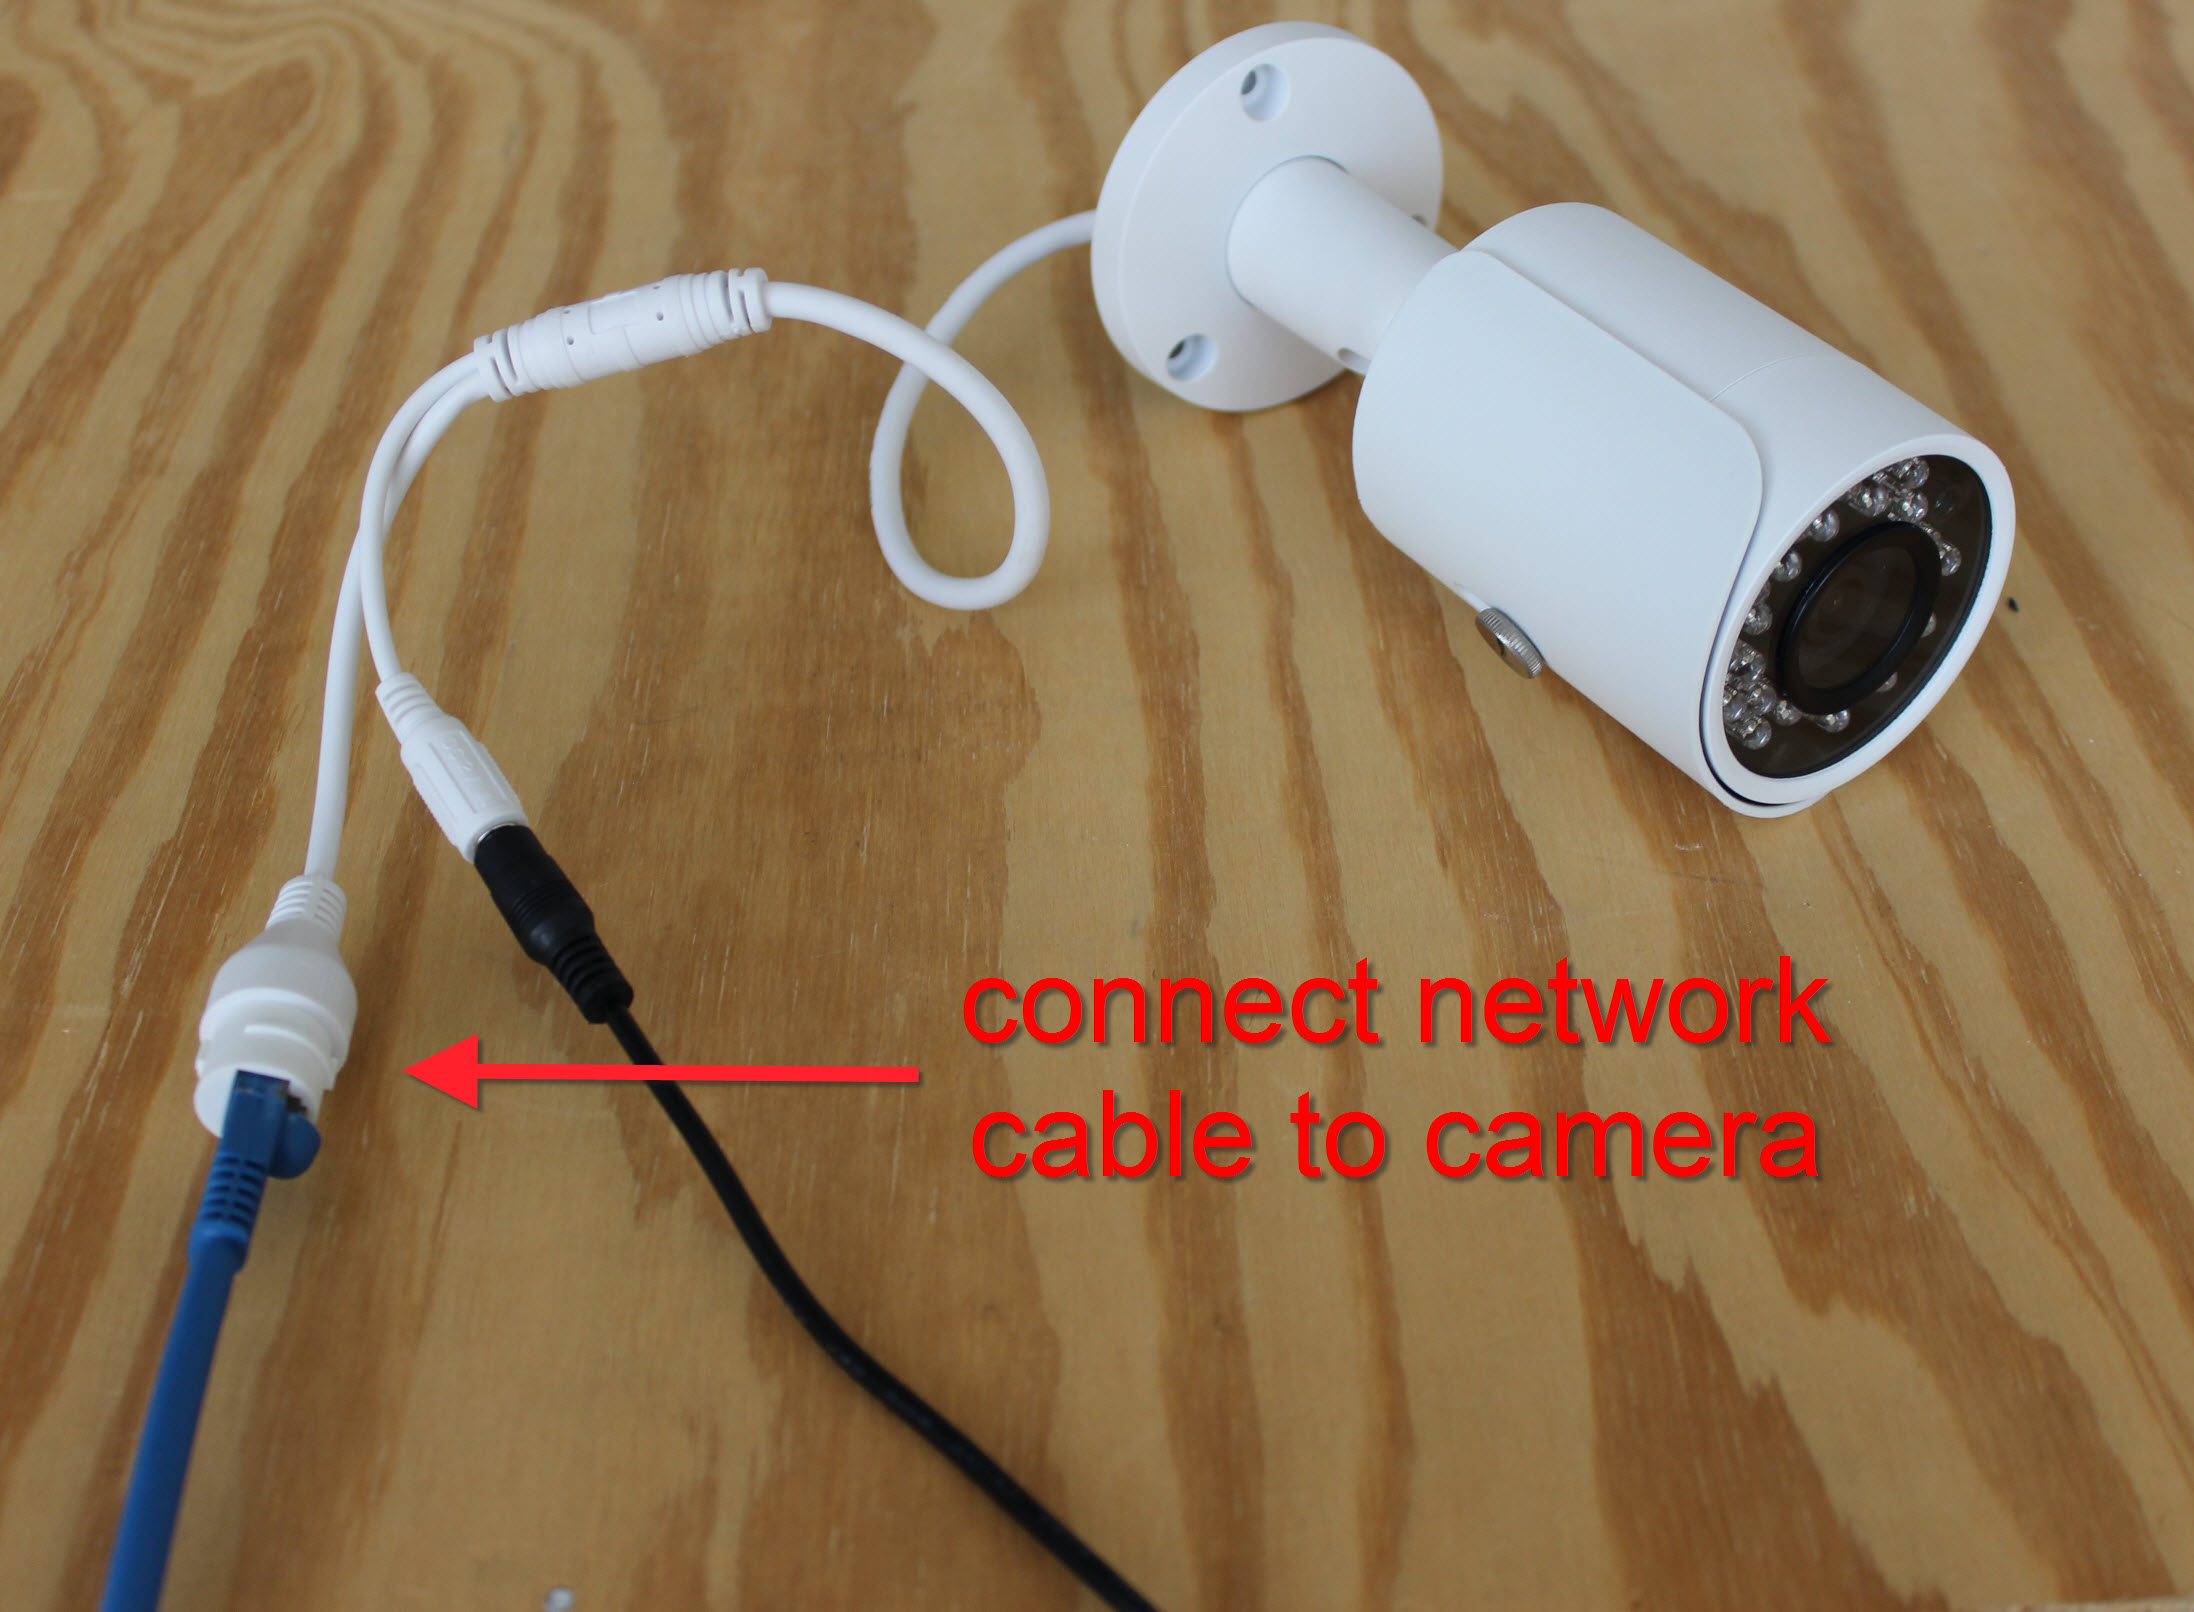
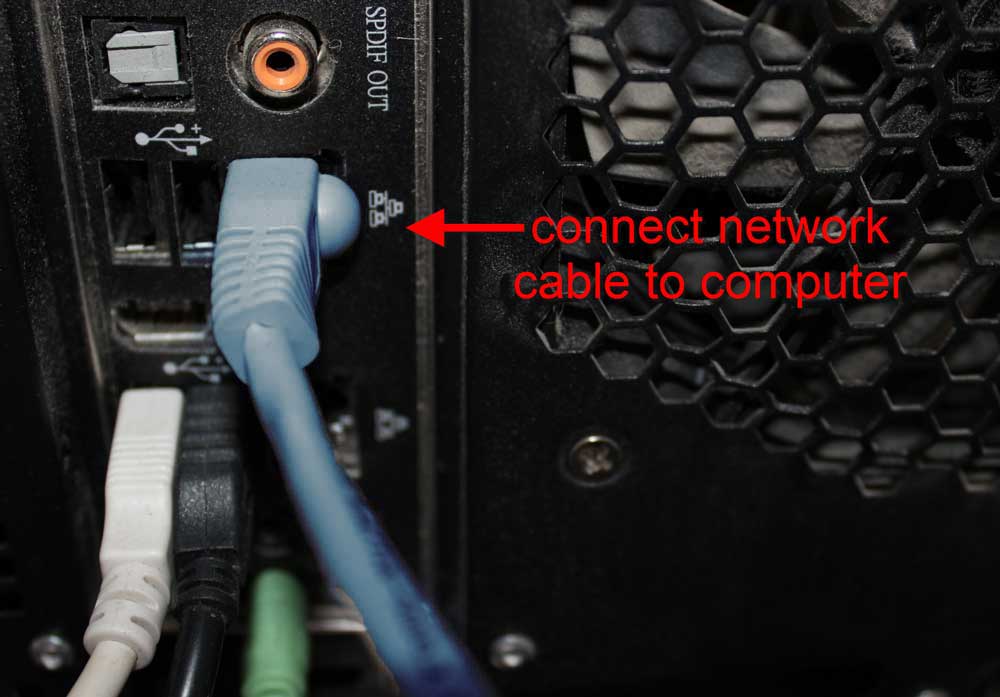
b) Next, connect a network cable from the camera to your computer.
c) Set your computer’s network port to a static IP address such as 192.168.1.200 so that you can talk to your camera. How did you do this on Windows Computer:
Changing the IP Address of Your Computer’s Network Port
Changing the IP Address of your computer’s Network Port using Windows 10.
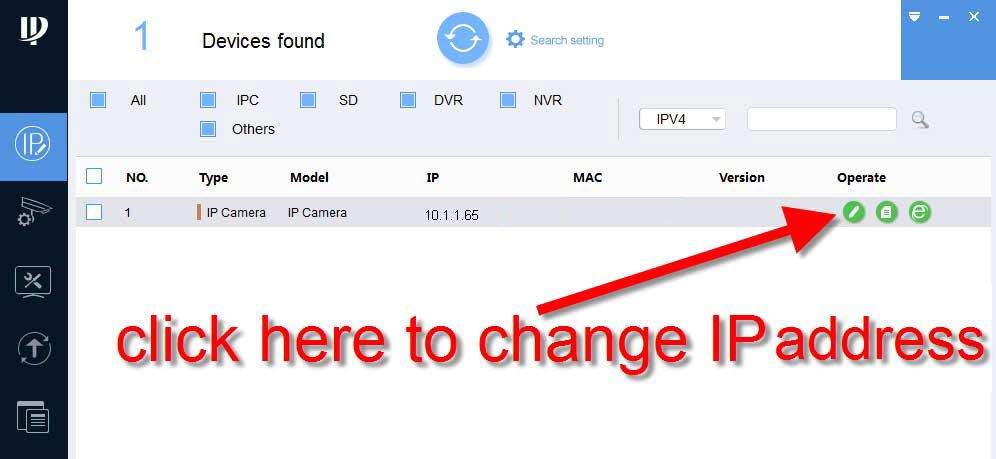
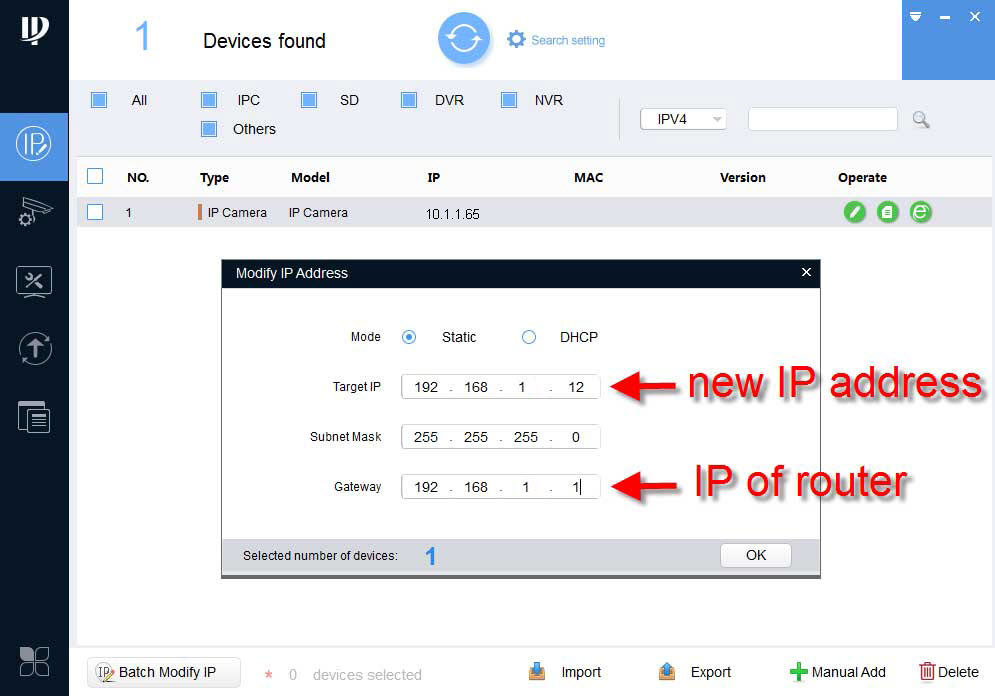
d) Once you have a static IP address assigned to your computer’s wired network port, turn off WiFi on your computer. You can find the current IP address of the camera using the Configuration Tool as shown. Our test camera’s current IP address is 10.1.1.65. If you need to change the IP address to allow it to say 192.168.1.120, you can do so by clicking the pencil icon to edit it.
e) As explained in our article connecting security cameras to the Internet, for two devices in a network to talk to each other, they must have the same IP address scheme. In 1C we set our computer’s address to be 192.168.1.200, we will change the address of this camera to 192.168.1.X, where X is a number between 2 and 254 and is not the same as our computer’s current address. We chose 12, so below is a screenshot of setting your camera’s ip address if you’re following it in our guide. Set the subnet to 255.255.255.0 and the gateway to 192.168.1.1.
f) After you have changed your camera’s IP address to an IP address that matches your network, type your camera’s new IP address in the URL of internet explorer. Here is a short example:
Viewing an IP Camera Using a Web Browser
In this video, you will learn how to log in to the Web Service using the Internet Explorer web browser and view the video stream of your IP camera.
You can also watch our camera using our PC software. Here is how SmartPSS is installed anyway.
Adding IP Cameras to Smart PSS
In this video, you will learn how to add IP cameras to smart PSS; so you can watch your camera remotely.
In a nutshell, the above is a quick and easy way to connect an IP camera to a computer with a wired network port. This is great in the following scenarios:
- You don’t have a router and want to set up a closed loop system between a computer and a security camera.
- You are trying to test or troubleshoot an IP camera.
- You are trying to connect to a security video recorder directly from a computer.
Most computers only have one network port; Therefore, this method can be problematic as it will only use your network port and cannot provide a wired Internet connection. The next 2 methods will show you how to set up a network camera on the network. Method 2 is for setting up a camera with a 12V DC power supply and Method 3 involves using a PoE injector or switch. The only difference between these two methods is how the camera power is delivered.
2) 12V DC power + router network cable to camera
This method will show you how to connect the IP camera to your router and view it over a network and power the camera using a 12V DC power adapter.
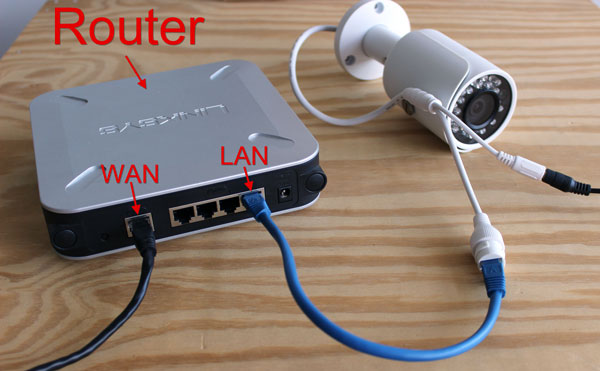
a) Connect a 12V DC power supply to your camera and connect the power adapter to the wall to power the camera.
b) Connect a network (Ethernet) cable from the camera to the router to establish a data connection between the camera and the router.
c) The camera takes about 2-3 minutes to boot. Use our IP Finder Configuration Tool to find the camera on your local area network (LAN). Below is a screenshot showing how it came to our case.
The camera currently has an IP address of 10.1.1.65. As explained in our article that connects security cameras to the internet, the IP address must match your network’s IP scheme in order for the camera to be accessed from your network computer. In our case, the router is IP 192.168.1.1, so we will have to change the IP address of the camera. To change the IP simply press the pencil icon to edit.
d) We will set the camera to an IP of 192.168.1.X, we chose 192.168.1.12. Before we go ahead and change the IP address, we have to consider duplicate IP addresses that will create network communication problems on the network. To see if a specific IP address is available on your LAN, use the command prompt in Windows to ping the address you want to use . Below is a video explaining how to use the ping command. You can also use this command on Mac in the terminal.
How to Ping the Device in Your Network?
How to Ping the Device in Your Network?
e) Let’s change the IP address. In our case, we set it to 192.168.1.12. In simple networks, usually the subnet mask 255.255.255.0 is the gateway router’s IP address. Press the OK button.
f) Once the camera has been assigned a new IP address, you can access the camera using your Web Browser or SmartPSS as shown in 1F above.
3) Camera – PoE Switch or PoE Injector
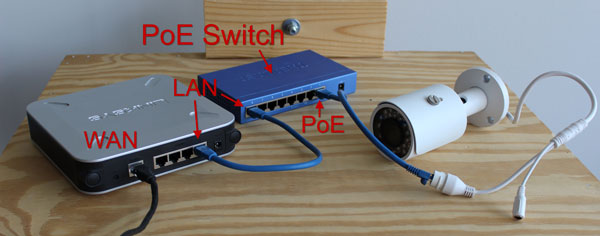
We discussed that PoE powers the camera and that a 12V power adapter is not required in this scenario.
In this method, you plug an Ethernet cable into the PoE port on a PoE switch or injector that is compatible with the camera. PoE switch or injector connects to router.
Here’s how you connect to a PoE switch.
Here’s how you connect to a PoE injector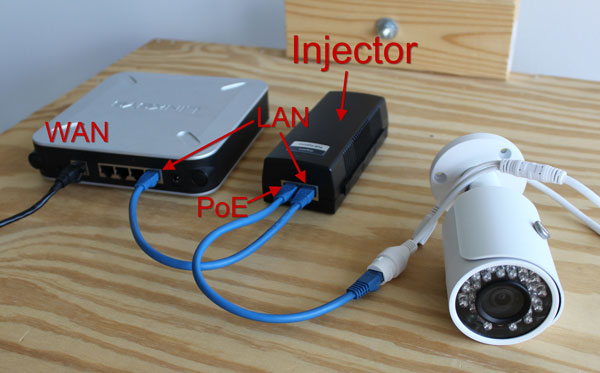
Again, use the Config Tool to find your camera’s IP address and change it to match your network layout as described in steps 2C to 2E (if needed). Once the camera is on the same network as your computer, you can login and view the camera as shown in Step 1F.
summary
At this point, you should now know a good amount about the network and have followed the above-mentioned steps to make your own IP camera system using your computer and IP camera .
Paylaşım için minnettarım bayım.
IP Kamerayı Bilgisayara Bağlama
Bilgilendirici bir yazı olmuş teşekkür ederim..
Çok bilgilendirici olmuş emeğinize sağlık
Çok teşekkürler büyük bi dertten kurtuldum sayende
Evime ip kamera kurmak istiyordum ve bu konuda internetteki bilgiler gerçekten çöp. Allahtan sizi buldum, çok teşekkür ederim dvrdestek!
IP kameralar, HD kameralar, Arlo kameralar
AHD kamera texnologiyası ənənəvi analoq təhlükəsizlik sistemləri ilə eyni infrastrukturdan istifadə edir və HD keyfiyyətində yüksək aydınlıqda görüntü təmin edilir və iqtisadi sistemdir.
Arlo Kameralar satışı
Ip Kameralar satışı
HD Kameralar satışı
Gayet detaylı bir anlatım yapmışsınız bu bilgileri öğrenmek çok iyi oldu teşekkürler.
Makalenizi severek okudum sizin sayenizde tam öğrendim ip kameraya bağlamayı teşekkür ederim.